Videos and instruction for using all elements of Juno Orders.
Contact Addresses
One of the key features underlying the Juno Orders system is the concept of Contact Addresses. Salesforce only allows the storage of two addresses for a given contact. Since many contacts may have more than two addresses, we too this opportunity to build the Contact Address related list. Using Contact Addresses will allow you to store as many addresses as you wish for a given contact.
If you have integration with a shopping cart, the Contact Address feature becomes even more meaningful. Any address the customer adds to their profile through the shopping cart will be synchronized with the Contact Addresses for their Salesforce Contact profile.
Contact Addresses come in very handy when creating Quotes, Sales Orders, Purchase Orders and Invoices. You’ll be able to leverage Contact Addresses within each of these Juno Orders elements. This time saving feature cannot be overstated.
Already have contacts in Salesforce and you want to create useful Contact Addresses from those existing addresses? No problem. Use the “Create Contact Addresses” button to generate new Contact Addresses based on the existing Salesforce addresses for that Contact.
JunoDOC PDF and email Templates
JunoOrders includes our JunoDOC PDF and email template application. When you install JunoOrders, the JunoDOC PDF and email templates are included and ready for you to customize for your business needs.
JunoDOC is an easy to use WYSIWYG PDF and email template builder for Salesforce. The current version only works with the JunoOrders elements, so keep an eye out for future releases of a stand-alone version.
You should have already gone through the installation process describing how to load the pre-defined PDF and email templates for Quotes, Sales Orders, Purchase Orders, Packing Slips, and Invoices.
The video above will describe in further detail how to make use of the JunoDOC application inside JunoOrders.
To change the logo, go to the Documents page and locate the logo image you plan to insert into the header of your PDF templates. Right click on the image and copy the image address. Paste that link into a text file. Next, go to the header template you wish to modify. Select edit, then select the source button. You will see the link to the logo image. Replace the part of the link which corresponds to the new image you wish to add. Hit the source button again and you should see the new image.
Product Setup
To make use of your Products in the JunoOrders platform, you’ll want to make some settings on the various product types to make sure things work as planned.
Defining Product Types
There are six Pre-Defined Product Types by default for JunoOrders.
- Inventory
- Non-Inventory
- Service
- Tax
- Shipping
We cover each one of these Product Types and how they function within JunoOrders and more specifically, withing the PDF templates from JunoDOC.
Account Types
Because JunoOrders considers Accounts to be either Customers or Vendors, you will want to define these within your Accounts.
This assumes you have gone through the installation process and added the “Terms” and “Account Type” to the Account layout.
For Vendors, you will set the Account Type to “Vendor”. For Customers, you will set the Account type to “Customer”. Not only is this setting used within JunoOrders, but it also applies to how Customer and Vendor Accounts are synchronized to external accounting systems like Quickbooks.
Quotations
JunoOrders comes with an easy to use customer quote module. The JunoOrders Quote module takes advantage of the Contact Address and JunoDOC PDF template feature. Choose the area you wish to learn more about.
Add Quotes to Contact Layout
Edit the page layout. Scroll down to related lists. Locate the “Juno Quotes” related list and drag it to the Related Lists section of the page.
Creating Quotes
You can create a new quote from either the Quote tab or from the Contact page. For this demo, we’ll start on the Contact page.
Convert Quote into a Sales Order
To turn a Quote into a Sales Order, you’ll want to add a Purchase Order number to the Quote. Next, you will change the Status to “Won”. Now you will be able to push the “Create Sales Order” button.
Sales Orders
The three ways to create Sales Orders are as follows:
- Turn a Quote into a Sales Order
- Hand-enter a Sales Order
- Sync a website order which creates a Sales Order
Quote to Sales Order
To learn how to turn a quote into a Sales Order, view the previous section on managing Quotes. A full description of the process is provided.
Manual Sales Order
Even though nobody likes entering data into a system, we’ve done a great job simplifying the process. Here are the steps.
- Start the Sales Order creation at either the Sales Order list view or from the Account.
- Choose the Contact for the Sales Order
- Select the Billing and Shipping Addresses from Contact Addresses
- Fill in any remaining details
Shopping Cart Sales Order
If you’ve connected JunoOrders to your Magento shopping cart by using JunoSYNC, you’ll enjoy automatic synchronization of all of your Customers, Products and Orders right from Magento into JunoOrders. This enables your staff to get on with the business of filling and shipping orders quickly.
Shipping
If your business involves products and shipping, you will find this section relevant. There are two ways to create a shipment. The first is to ship product from one of your warehouses. The second, is to create a shipment from a supplier (i.e. a Drop Shipment). Both ways are rather similar.
Standard Shipment
A standard shipment is a shipment that happens in your warehouse. You have the product ready for shipment and so you create the shipment to be recorded.
Purchase Orders
If you order product for stock or to have suppliers ship directly to your customer (AKA Drop Shipments), then these two sections will shed some light on this process. Even if you only create Purchase Orders for non-inventory items such as office supplies, this section will still prove useful,
Inventory Purchase Orders
Inventory Purchase Orders are those Supplier Orders for items that you plan to stock on your shelves. Of course, you can also create Purchase Orders for non-inventory items that your business likes to keep track of. This video will cover these topics.
Drop Shipment Purchase Orders
Drop Shipment Purchase Orders are those orders that you are having a supplier ship on your behalf. Creating drop shipment Purchase Orders also takes care of adjusting the quantity to be shipped on a Sales Order. This Drop Shipment process also creates a Shipment on the Sales Order as it relates to the Purchase Order.
Both the PDF and email templates will be applied to this newly created PO. It’s important to note, that both the Account and the Contact at the Vendor must be marked appropriately. This means the Vendor needs to be marked as “Vendor” and the Contact must be marked as “Vendor Contact”. Doing so, ensures that the PO can be created and that the email will go directly to the correct Contact at the supplier.
Invoices
The last step in the customer service chain is sending out a final invoice. Invoices may be paid in full or have a balance due. In both cases, the invoice will contain all of the relevant details including Sales Order number, Purchase Order Number and Shipment Tracking.
You can manually create an Invoice by clicking on the “Create Invoice” button at the top of the Sales Order. This will generate a new Invoice against the Sales Order. Next, you would click on the newly created Invoice at which point you can click on the “Preview PDF” button and either download or email the customer their Invoice.
It’s very easy to automate Invoice and Payment creation and emailing by using the “Billing” trigger. To execute the “Billing” trigger, use the Status dropdown menu on the Sales Order and select “Billing”. Immediately an Invoice will be created and a PDF copy sent to the customer. In addition, if any payments had already been received, those will be applied to the invoice, so the final invoice will accurately represent any payments or balance due.
If the customer is on NET terms, it’s wise to have already created a Contact under the Account for an Accounts Payable person. By checking the “AP Contact” box on the Contact record, this will enable Juno Orders to always send a copy of the Invoice to the AP Contact.
Status
The following objects have Status requirements in order for Juno Orders to work properly.
- Quote
- Sales Order
- Purchase Order
Quote
In order to convert a Quote into a Sales Order, the Status must be set to “Won”. In addition, there needs to be a Customer PO Number present as well.
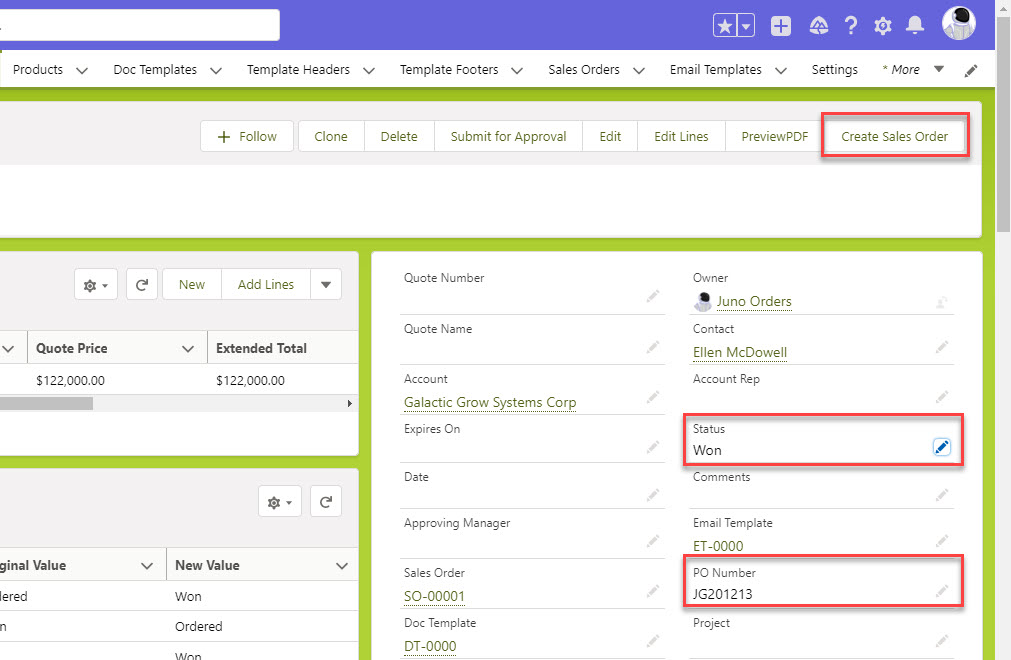
Once the two conditions are met, the user may select the “Create Sales Order” button to create a Sales Order. The Status will then change to “Ordered”.