JunoOrders Quick Overview Video
Accounts
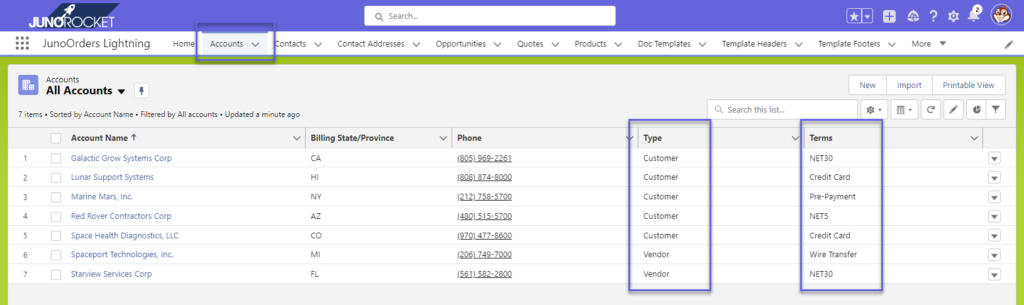
Salesforce does not differentiate between a Customer Account and a Vendor Account. For this reason, we added a Picklist for the Account named Type. Each Account should be labelled as either a Customer or a Vendor in order to work with JunoOrders.
We also added a Terms Picklist to the Account object. Feel free to add or modify the available Terms Picklist choices to meet your organizations needs.
Contacts
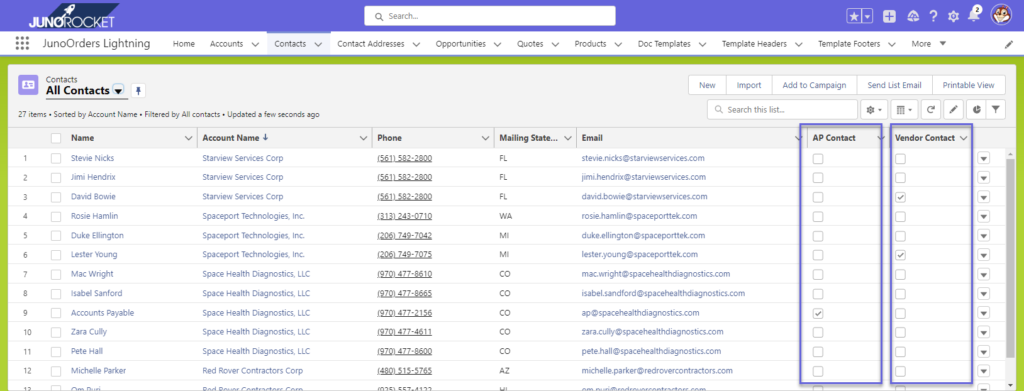
On the Contact Object are two checkbox fields for AP Contact and Vendor Contact. The AP Contact is that Contact, which should always receive Invoice emails for completed Sales Orders. The Vendor Contact, is that Contact that should receive a copy of any Purchase Order emailed from JunoOrders.
When you create a Purchase Order, the User only has to select the Vendor Account. The Contact and Vendor Address will be automatically added to the Purchase Order for you.
Contact Addresses
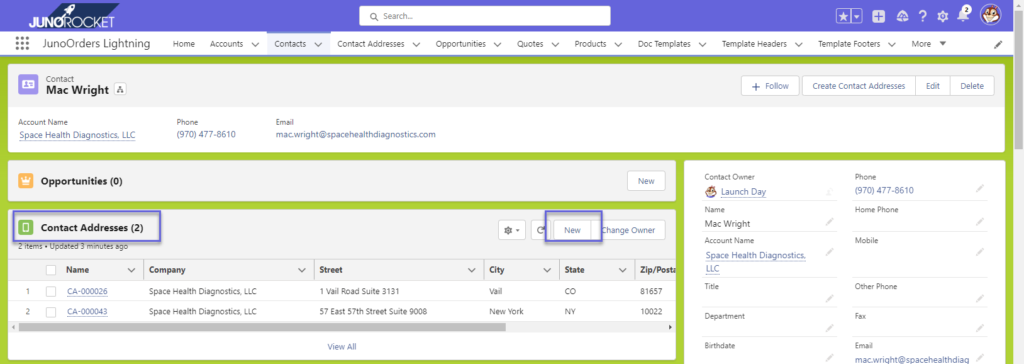
The Installation Instructions showed you how to bulk create the Contact Addresses for your entire Salesforce Org. To manually create a Contact Address, click the Create Contact Address button on the Contact page.
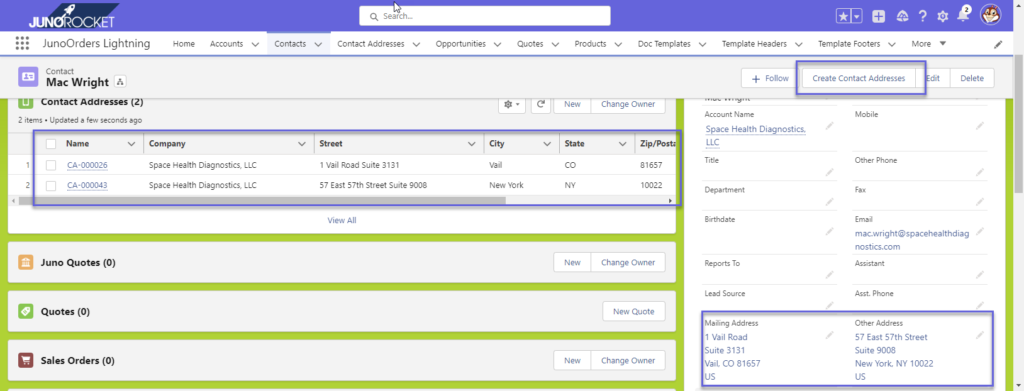
If you need to create additional Contact Addresses, click the New button on the Contact Addresses Related List Object and fill in the blanks.
You’ll notice that you can use any Company Name, Contact Name and Address for these additional Contact Addresses. This comes in handy when the customer has multiple locations that may not share the same company name.
Products
JunoOrders uses the standard Salesforce Product Object. A few fields are available for the Product Object to make them work well with JunoOrders.
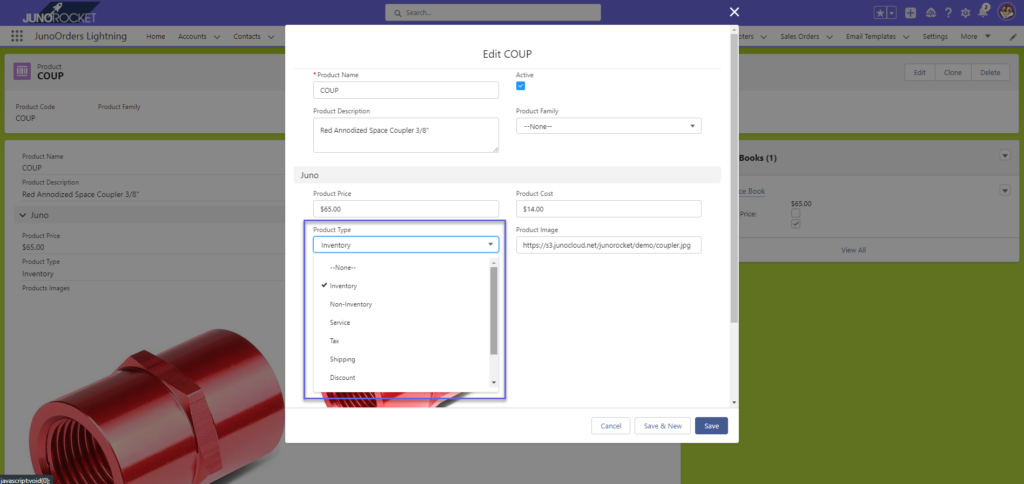
At a minimum, you will need to make sure your Products are marked Active. In addition, you’ll also want to add Product Cost, Product Price and Product Type, so that JunoOrders will know how to make use of these Products.
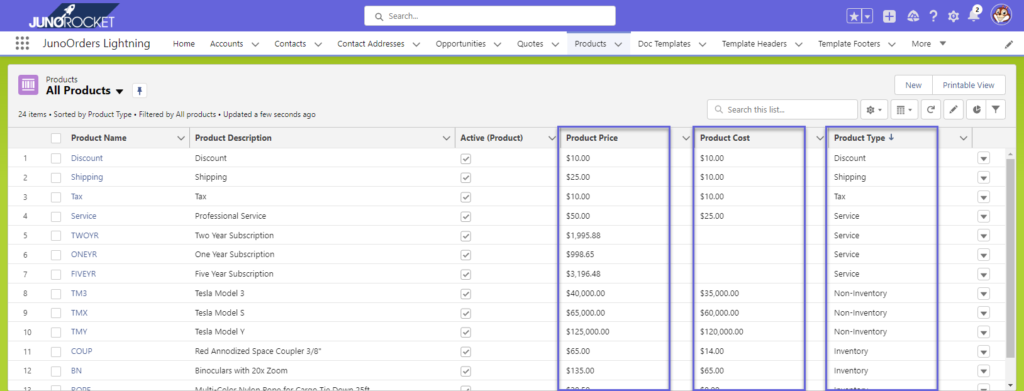
You’ll notice that the Product Type Picklist looks similar to what accounting systems use for categorizing sales of different items. This is intentional and allows customers to more easily integrate with accounting systems. There are several reasons why we include a Cost field as well. First, when creating a Purchase Order, we need to have a Cost that can be used by default. Second, accounting systems require a Cost in order to sync new Products.
Inventory
Product Inventory Ledger
On the Product Object, add the Inventory Ledger Related List to the Page Layout.
Add the following Inventory Fields to the Product Page Layout as well
- Product On Hand
- Forecast SO
- Forecast PO
Existing customers upgrading to this version with Inventory Management will also want to add the Inventory Ledger Related list to the Purchase Order Object.
Inventory Adjustments
To create the initial inventory values from the Product Page, click New on the Inventory Ledger Related List.
Select the Action Picklist and choose INSERT.
Enter the desired value into the Credit Field to increase the Quantity on Hand or enter a value into the Debit Field to reduce the Quantity on Hand.
Click save to commit the new Credit or Debit to Inventory
Product On Hand
Product On Hand is the currently known value for the amount of the Item on hand
Forecast SO
Forecast SO is the total amount of the Product known to be pending on an open Sales Order. That is to say, there are one or more Sales Orders open that have yet to be shipped, which contain this Product.
The Forecast SO value Increases when a Product is added to a Sales Order and Decreases once that Product has been Packed into a Shipment. The action of Packing the Shipment will reduce the Forecast SO, while also reducing the Product On Hand by the same amount.
Forecast PO
The Forecast PO is the sum of all Product on Open Purchase Orders (those Purchase Orders that have yet to be received).
When a Product is added to a Purchase Order, the Quantity of that Product being ordered is added to the Forecast PO value to demonstrate that this Product has anticipated inbound inventory that has yet to be received.
Changing the Purchase Order Status from Open to Received will cause the Product(s) to be received into Inventory by reducing the amount on Forecast PO and increasing the Product On Hand.
Opportunity
JunoOrders integrates with the Salesforce Opportunity Object. Specifically, we’ve added a Contact Lookup along with Contact Address Lookups. Using the Create Juno Quote button on the Opportunity, you may create one or many JunoOrders Quotes and have them all associated with the Opportunity.
Any Products listed on the Opportunity may be added to any JunoOrders Quote being created from the Opportunity.
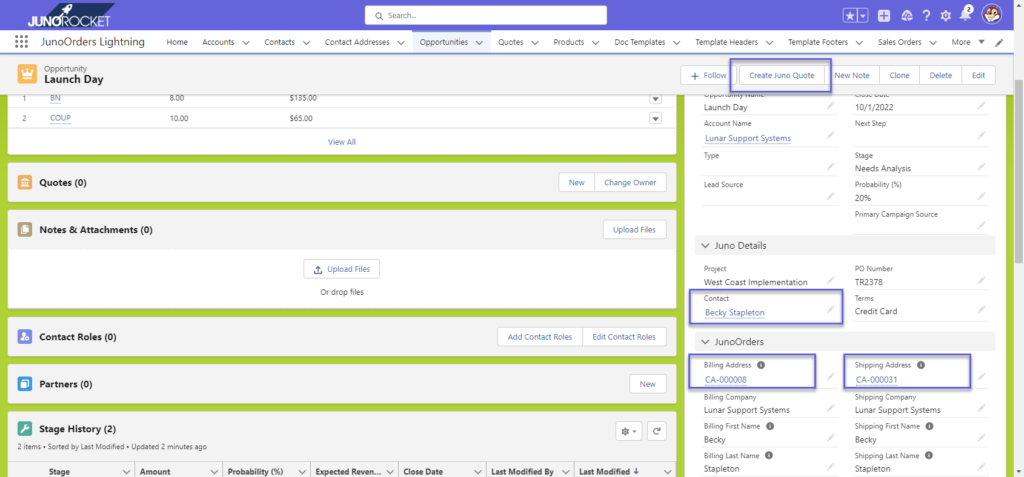
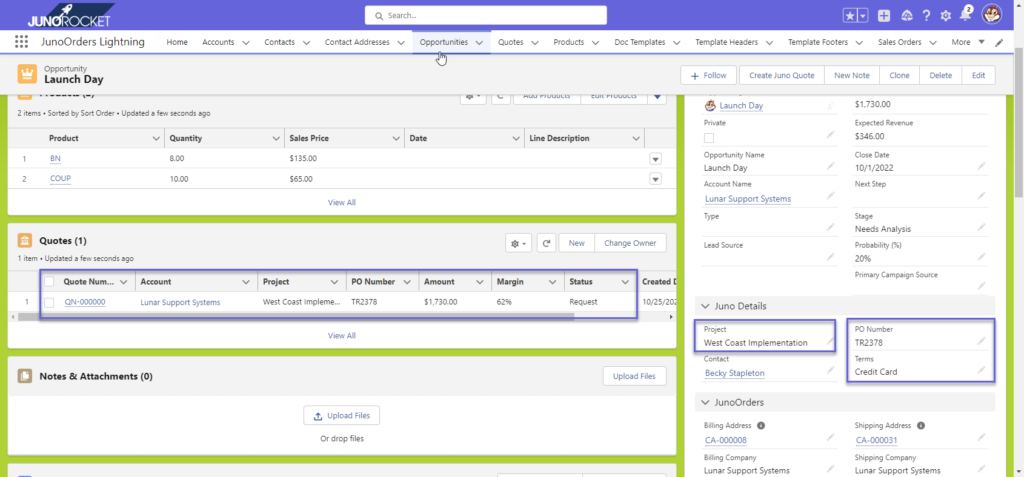
We’ve added additional fields from JunoOrders to the Opportunity Layout, including Project, PO Number and Terms. The Terms are pulled from the Account Object field and all of the fields will copy over to any JunoOrders Quote generated from the Opportunity.
Quote (Salesforce)
Salesforce did not originally have a Quote Object for Lightning, however, they did eventually develop this Quote Object. JunoOrders allows you to make use of the standard Salesforce Quote Object if you are already using it.
Similar to the Opportunity, JunoOrders offers Contact Name Lookup, along with Billing and Shipping Addresss Lookups, which make it easier to flow from Opportunity > Quote > JunoOrders Sales Order.
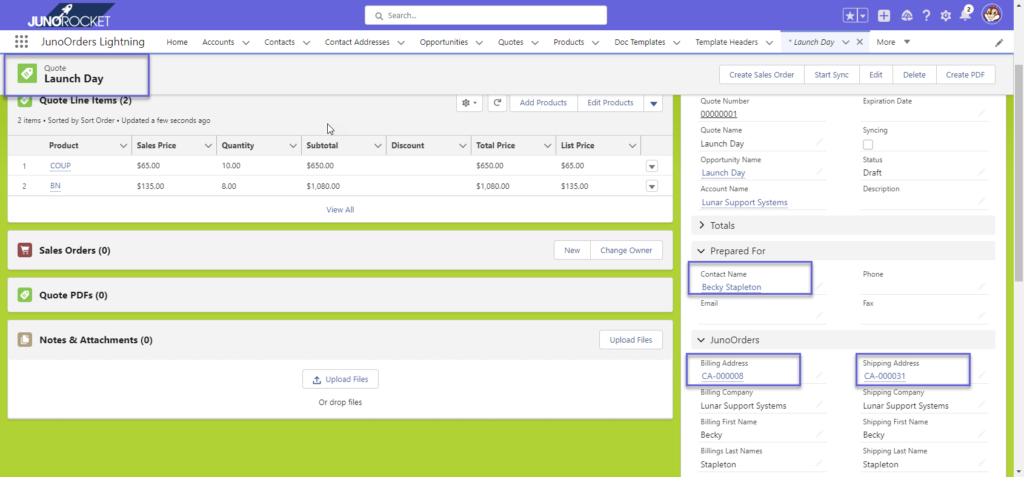
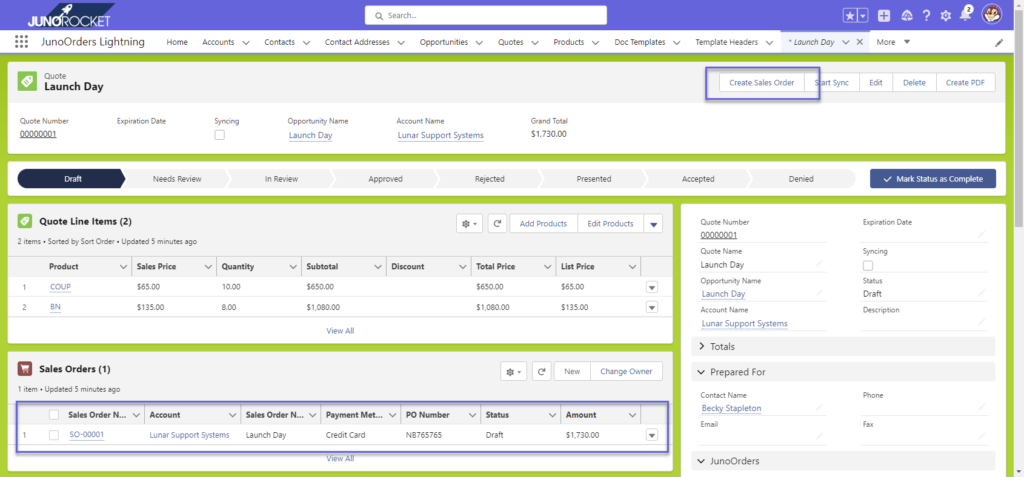
Click the Create Sales Order button to generate a JunoOrders Sales Order.
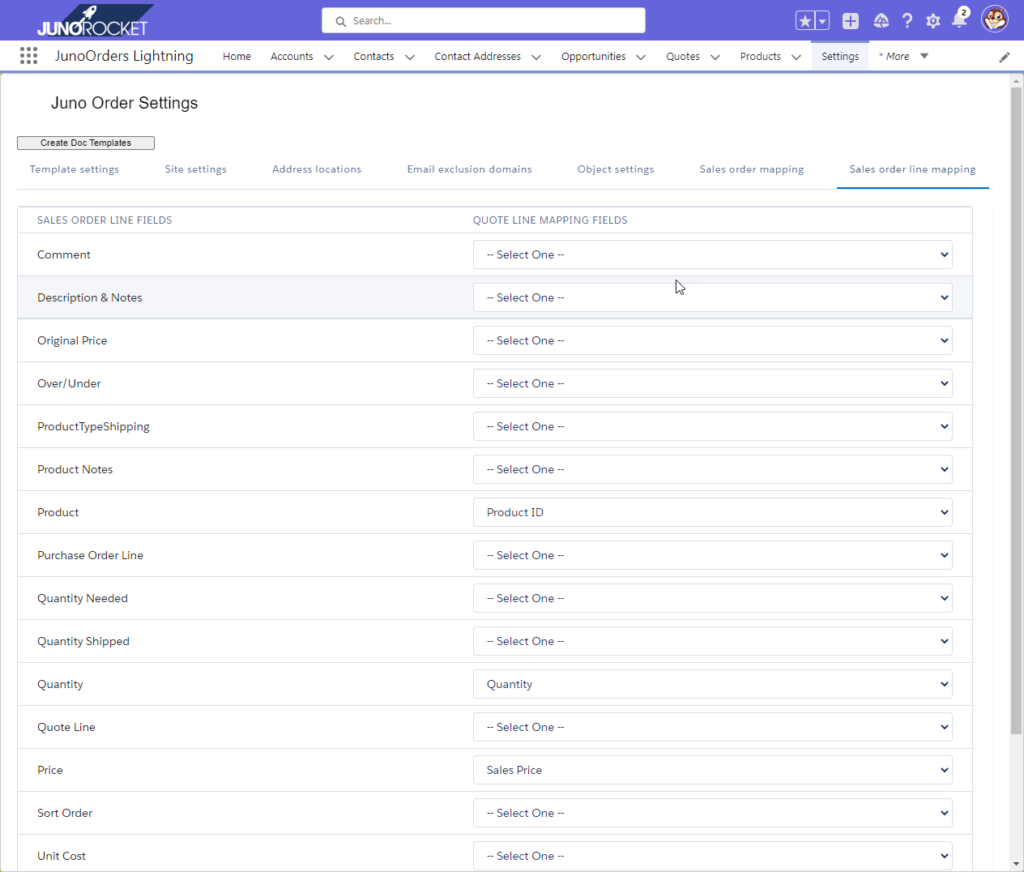
In the JunoOrders Settings Tab, there are two sections for mapping the Salesforce Quote to Sales Order fields. The Sales Order Mapping should have the following at a minimum
Sales Order Mappings

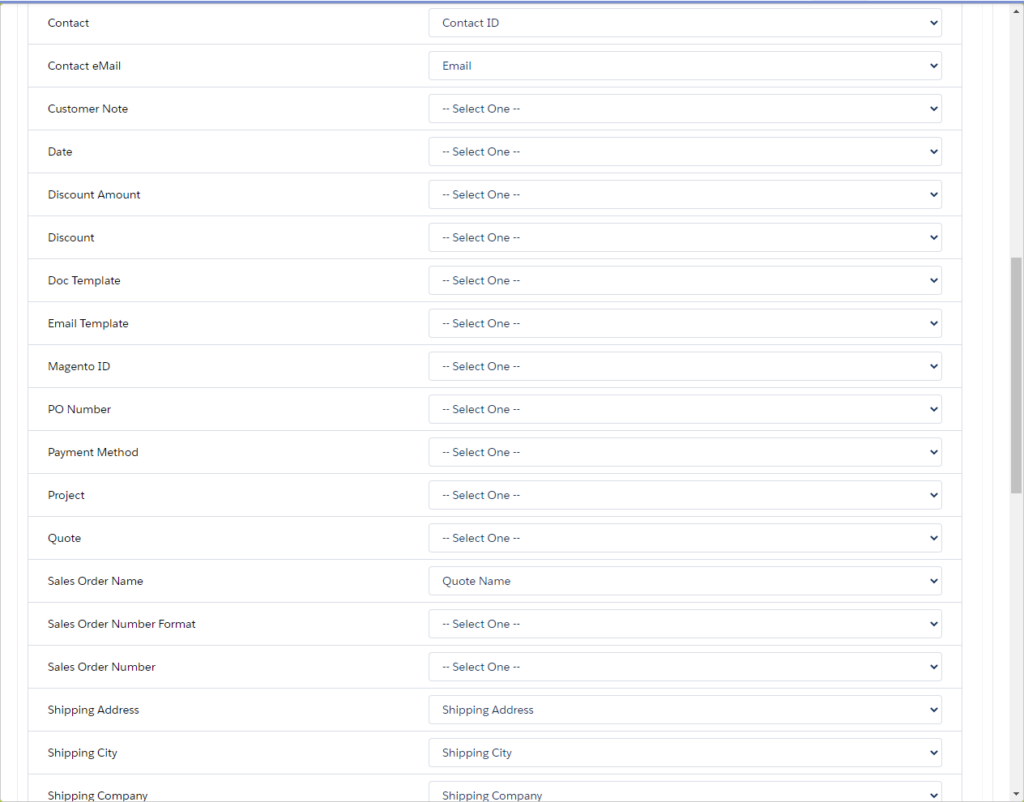
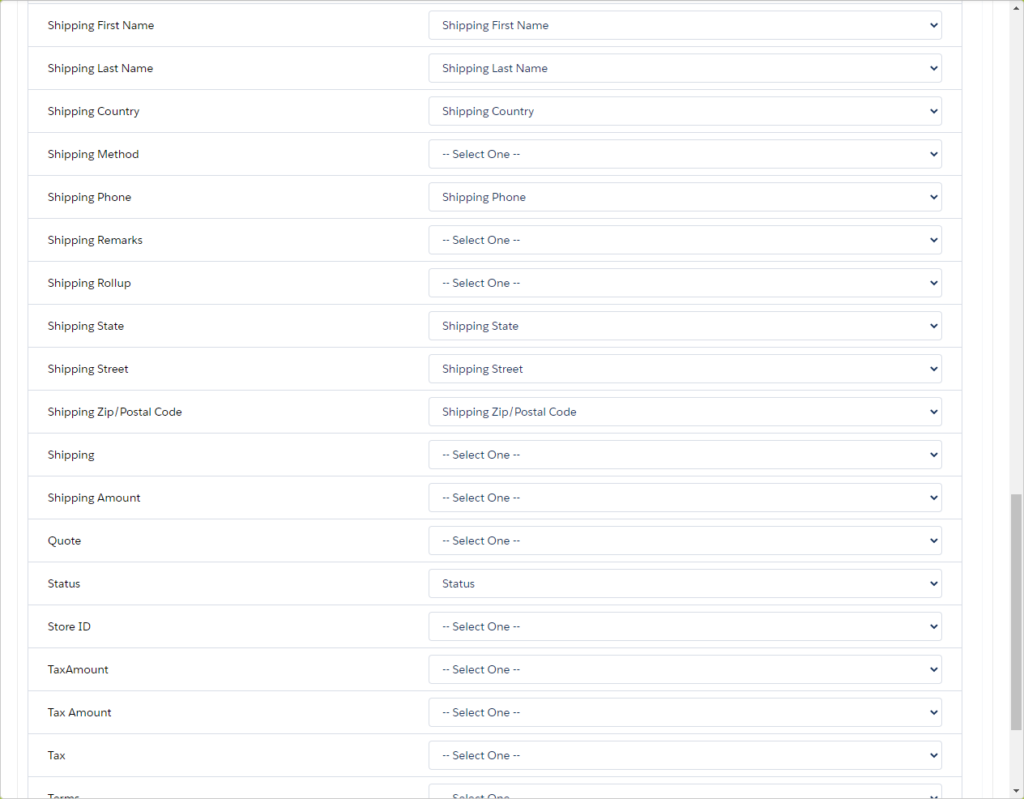
Sales Order Line Mappings
Quote (JunoOrders)
As described in the Opportunity section, JunoOrders Quotes may be created from Opportunities. In addition, you may also create a JunoOrders Quote without having to start with an Opportunity. This is a key differentiator, between the JunoOrders Quote and the Salesforce Quote. Sometimes, you just need to send a Quote and you don’t need to spend the time going through the Opportunity Object.
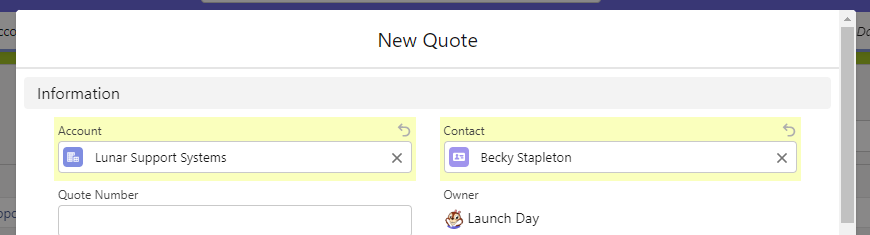
Click on the Quotes from the JunoOrders Menu and select New

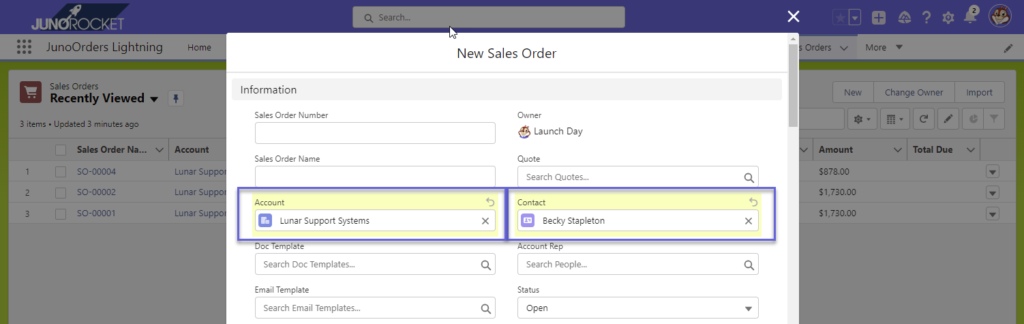
Add the Account and Contact. Hint: Salesforce requires you to type in the first three letters anytime you’re entering text in a Lookup field.
Scroll down in the same window to add the Billing and Shipping Addresses. Type in “CA-” to show available addresses.
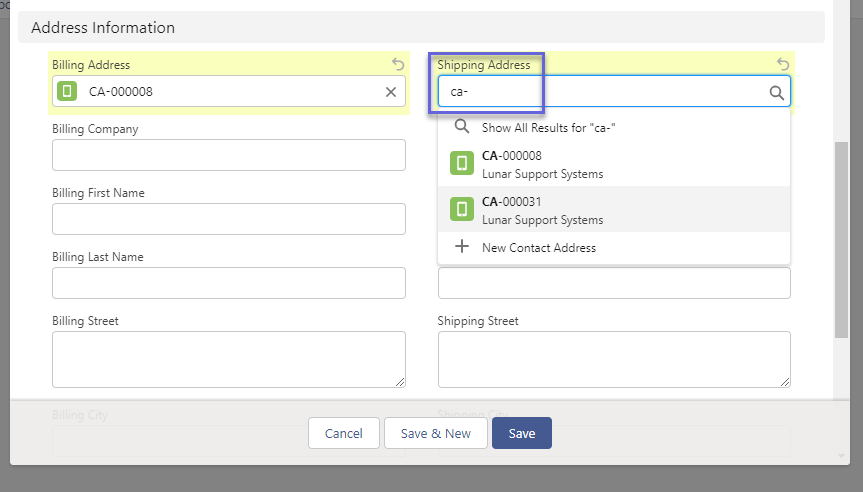
Click Save and the new Quote will be created. Click Add Lines on the Quote Lines Related List. Select the item(s) you wish to add and click Next.

Enter the Quantities needed for the Quote. Product Price and Cost are automatically queried from the Product catalog. You may change the values here if needed.

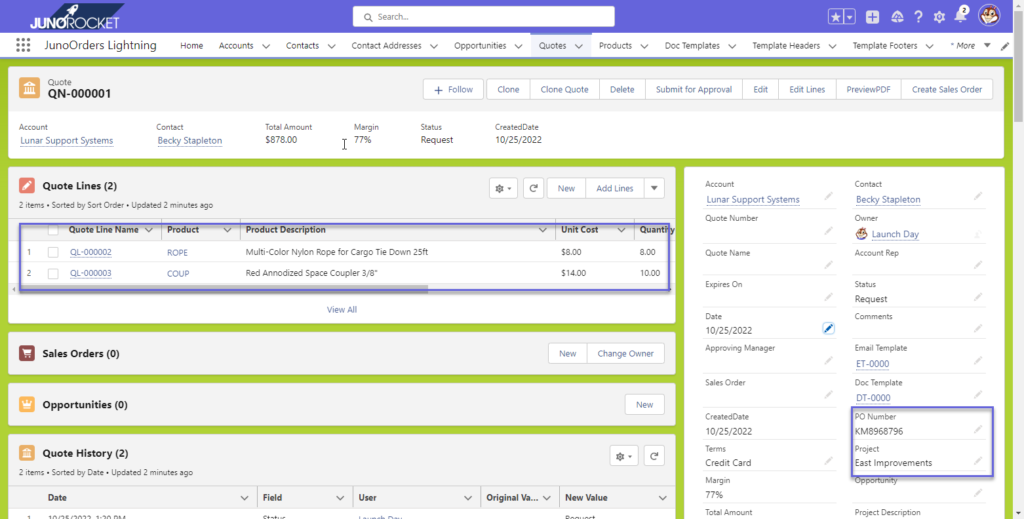
Products are added and Quote Margin is calculated. You can add the customer PO Number, Project note, Project Description and other details to finalize the Quote.
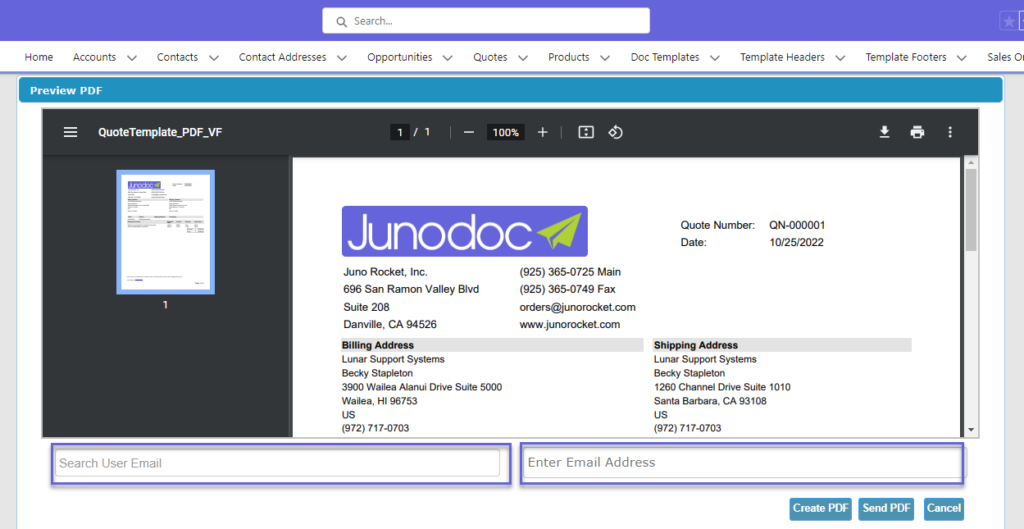
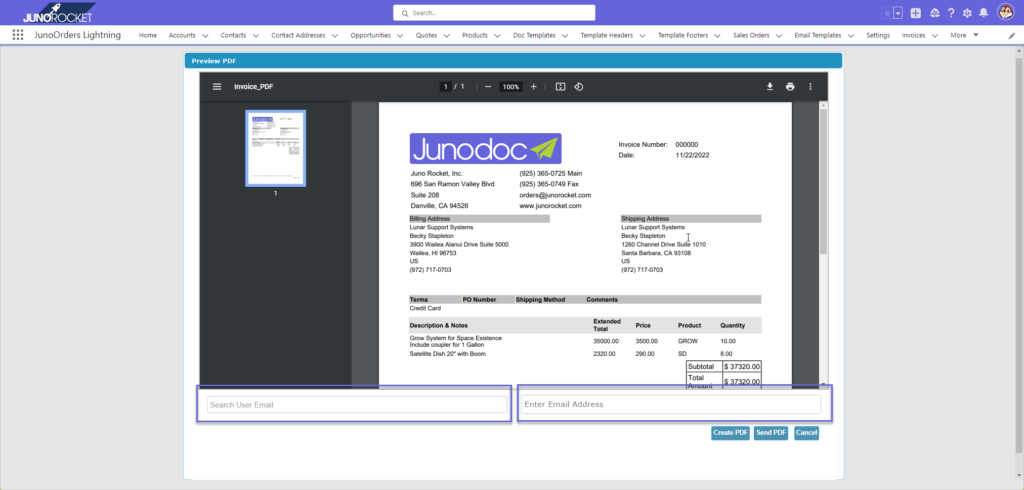
To view the PDF, click on PreviewPDF button in the top right. The default template (established in Settings), will be previewed. If you click “Send PDF”, the Quote will be sent to the Salesforce Contact listed on the Quote. You may add additional Salesforce Users (left query box), or enter an email address (right entry box).
When you are ready to create a Sales Order from the Quote, click on the “Create Sales Order” button in the top right of the screen.

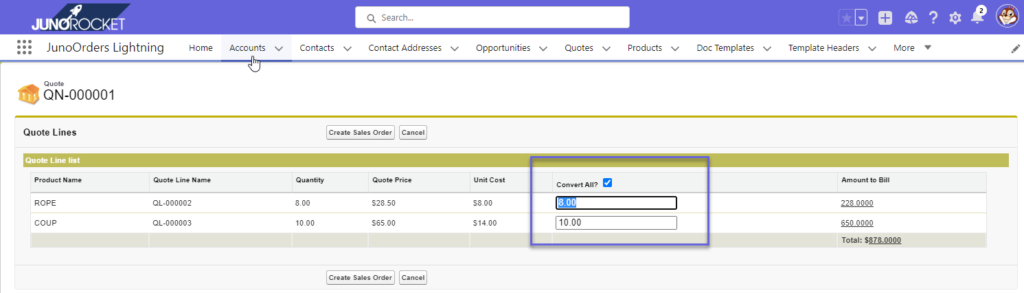
The next screen allows you to “Convert All” by checking the box, or select certain line items and use any quantity you wish in order to create a Sales Order. Click “Create Sales Order” once the desired quantities have been entered.
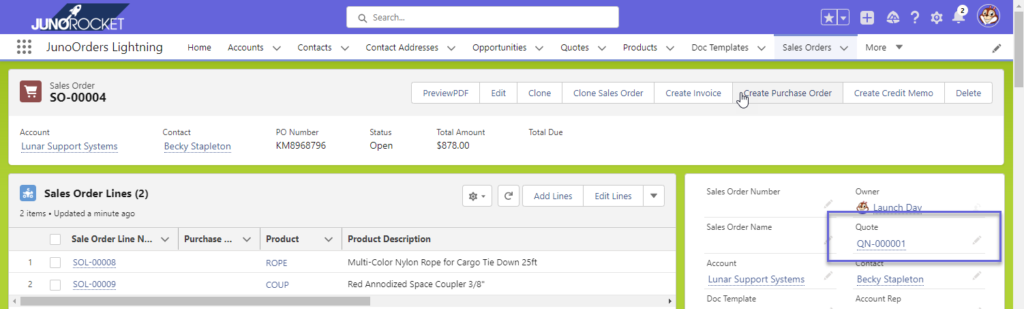
On the newly created Sales Order, you will see the link to the Quote used to create the Sales Order.
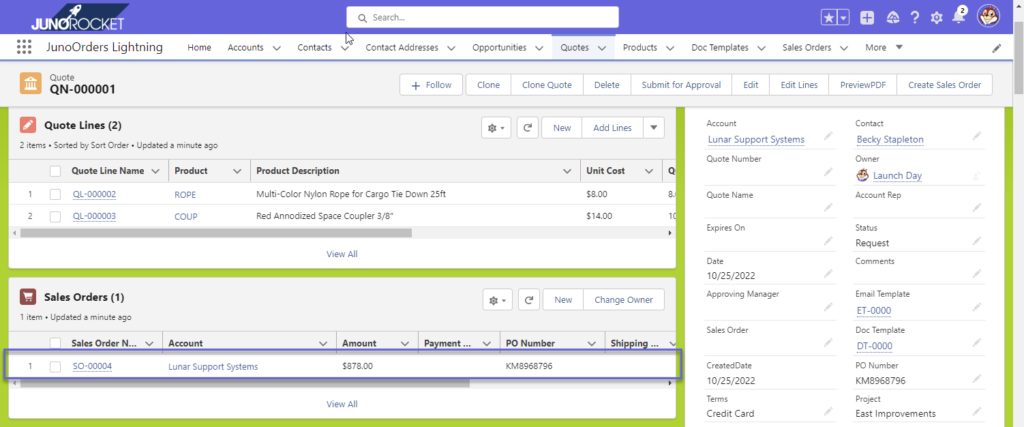
Click on the Quote link to be returned to the Quote, where you will see a list of Sales Orders that were generated from this Quote.
Sales Order
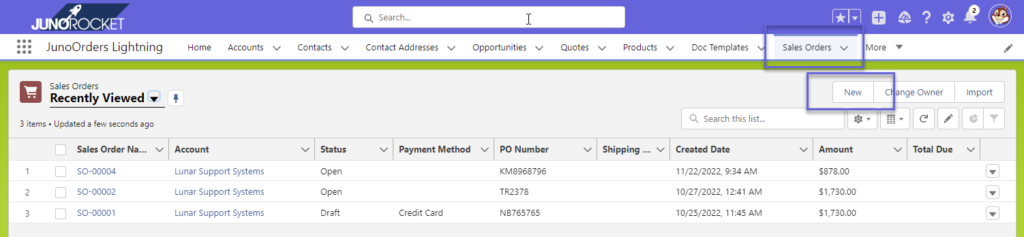
Sales Orders may be created by clicking on the Sales Order tab and then selecting “New”. The user may also convert either a Salesforce Quote or a JunoOrders Quote into a Sales Order. The process for creating a new Sales Order from scratch, is the same process as create a new JunoOrders Quote as shown above.
Ideally, your Account will already be marked as a Customer, with Terms defined. In addition, your Contact should have at least one Contact Address available to populate the Sales Order.
Scroll down to locate the Billing and Shipping Addresses. Start typing CA- (Salesforce lookups require at least three characters to search ahead) and you will be presented with all Contact Addresses available for the selected Contact.
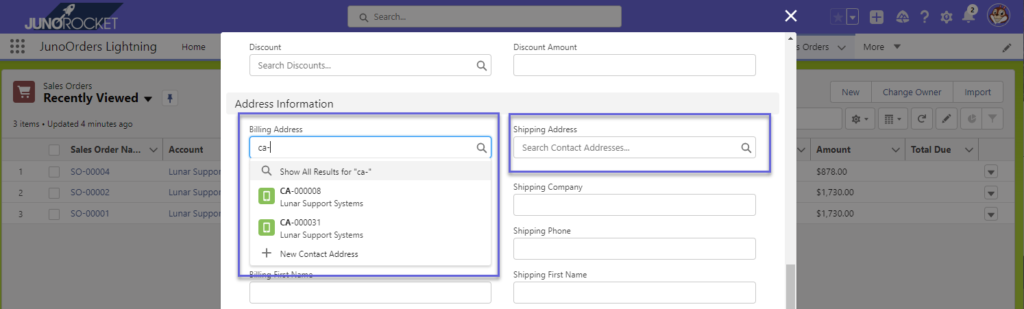
The address fields will remain empty and will populate from the Contact Address once you select “Save”

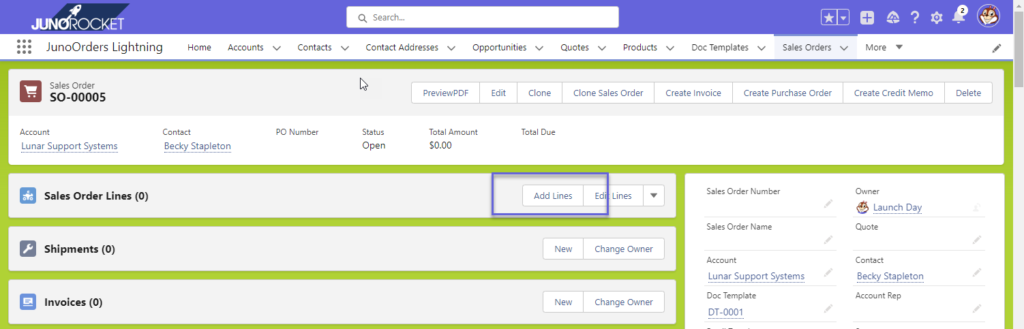
Adding Products
Use the Sales Order Lines Related List to add Products and Services to your Sales Order.
Use the search box to find Products and then select the checkbox next to the Product to add. Products need to be “Active” and should also have the Product Type, Price and Cost defined at the Product level.

Assuming your Products have the JunoOrders Price and Cost fields populated, those values will be used on the following screen as defaults and may be changed here or even changed once they are added to the Sales Order.
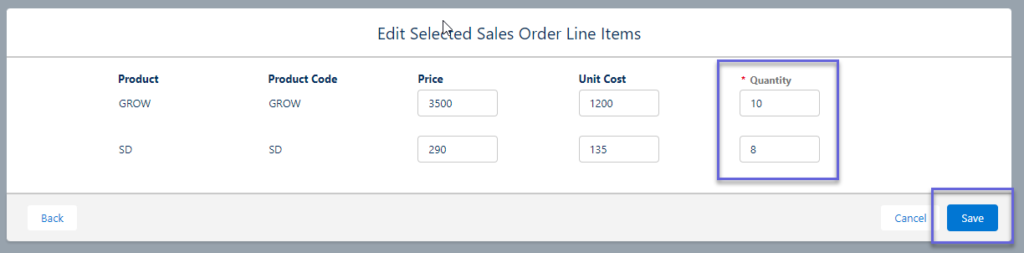
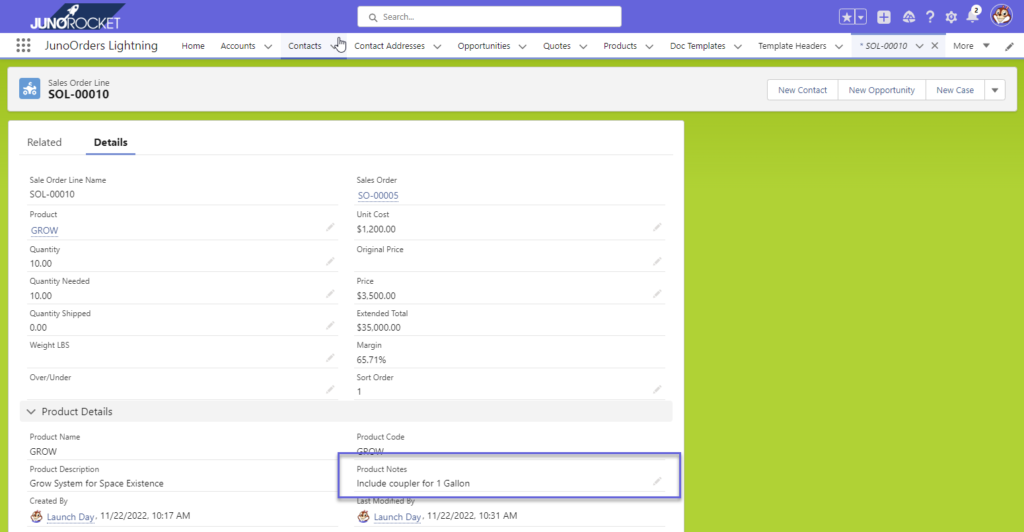
You may add additional Product Notes to any Sales Order Line to insure relevant details regarding a specific Product are being communicated properly. On the far right side of the Sales Order Line window, click the down arrow and select Edit.

Add Product Nate as shown (if needed).
Payments
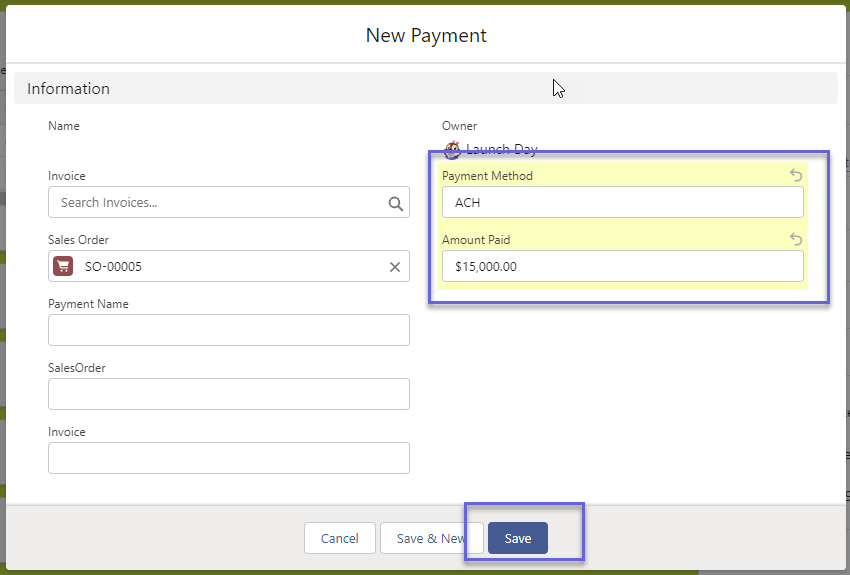
To record a Payment against this Sales Order, click the New button on the Payments Related List.
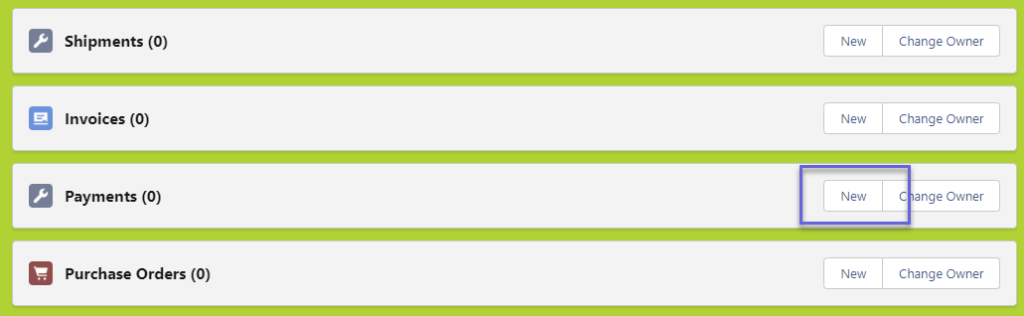
The only two fields to needed to create a Payment are Payment Method and Amount Paid. Click Save and the new Payment will be applied and the Total Due will update.
Shipments
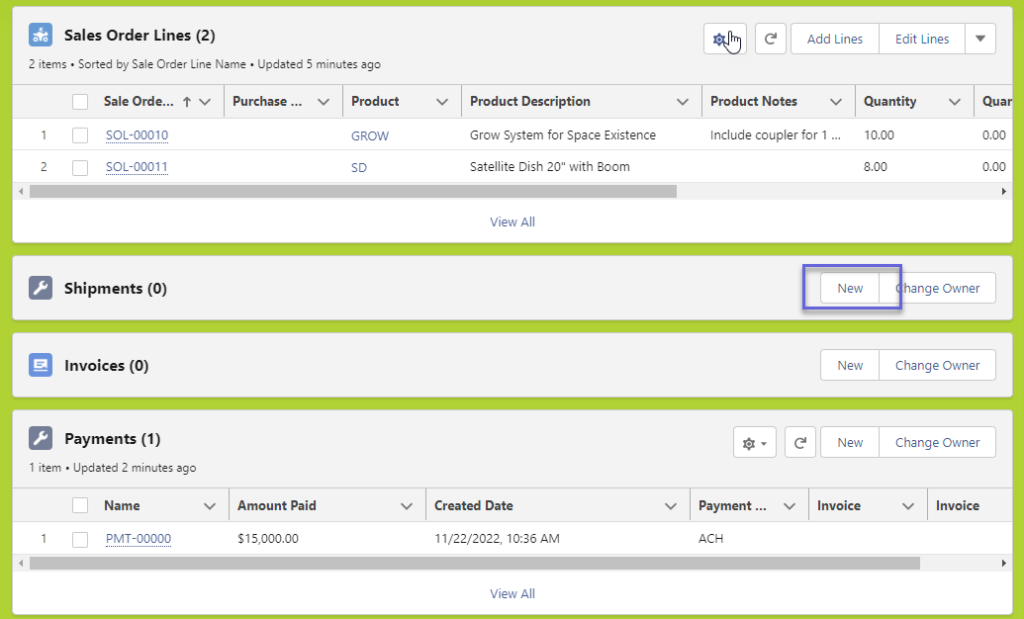
To create a Shipment, click the New button on the Shipments Related List. This is an optional feature for customers who ship physical products and wish to generate a Packing Slip.
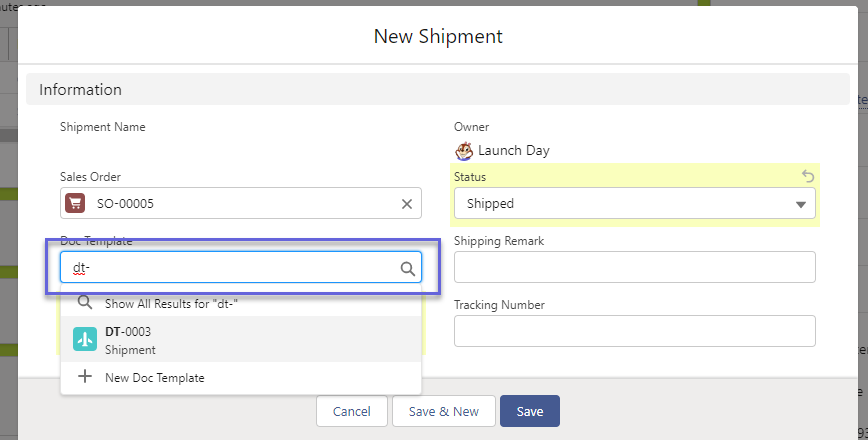
Type in DT- to display all available Packing Slip template options. Use Picklists for Status and Shipping Method. Add Tracking information and Remarks as needed. Note: The Shipping Method Picklist can be modified to suit your needs.
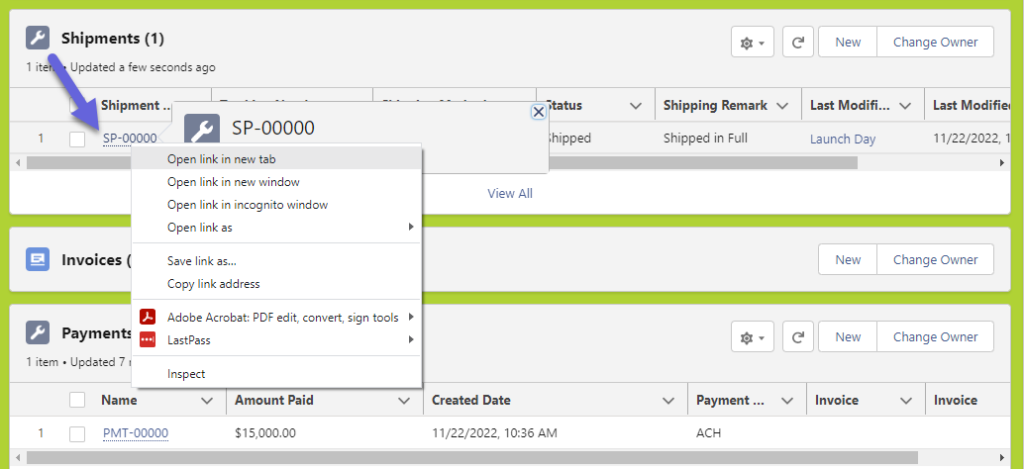
Right click on the newly created shipment to open in a new tab
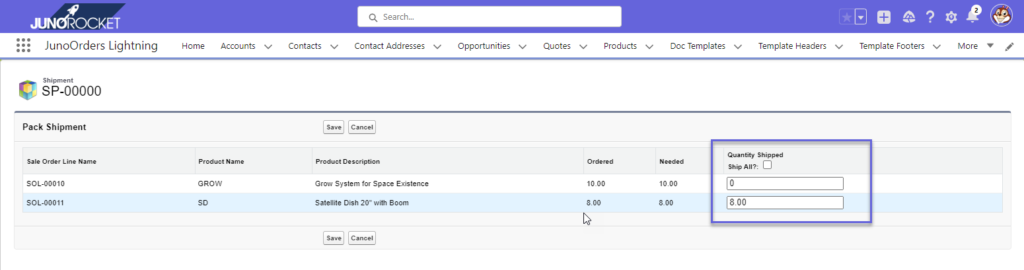
Click the “Pack” button to Add Products from the Sales Order to this Shipment.
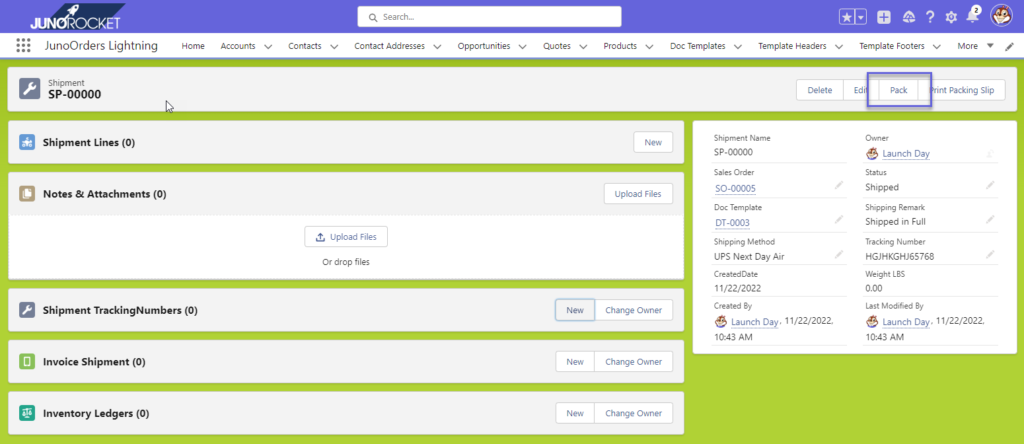
Click the Ship All checkbox to add everything from the Sales Order or enter a specific quantity being shipped if this is a partial shipment. For this example, we will ship one line and leave the other line unshipped. Click Save.
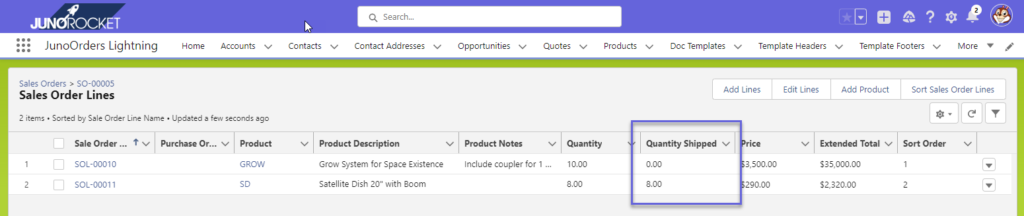
You may generate a Packing List by clicking on the Print Packing Slip button in the upper right corner. Click on the link to the Sales Order to return back to the Sales Order. Here you can observe that one of the two line items has been shipped in full.
Note: to view this Related List in full screen, click on the View All link at the bottom of the Sales Order Lines Related List.
Purchase Order (Drop Shipment)
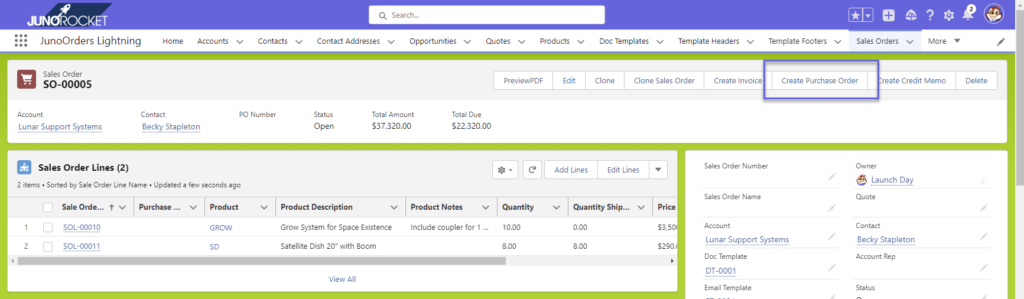
There are two ways to generate a Purchase Order. The user may generate a “Drop Shipment” Purchase Order directly from the Sales Order, by clicking the Create Purchase Order button in the upper right corner of the Sales Order.
Note on this Sales Order, that one line item has already been shipped the traditional method, but creating a shipment, then packing the shipment. Using the “Create Purchase Order” method, will automatically create a Shipment for you.
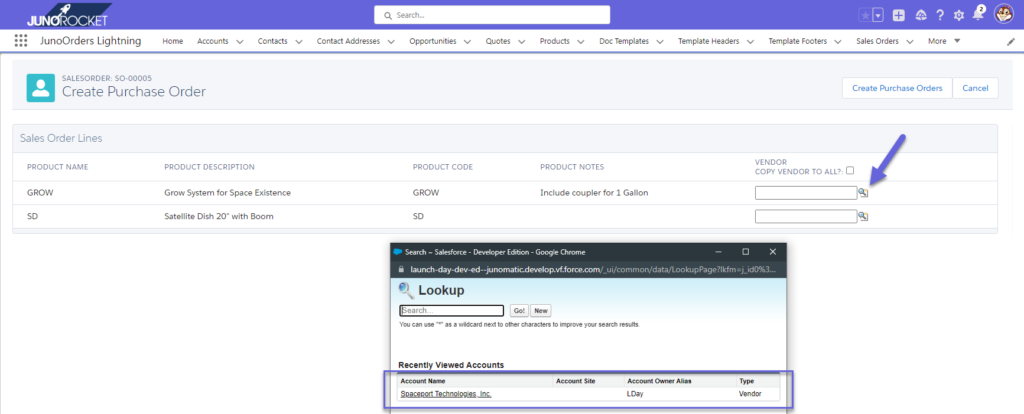
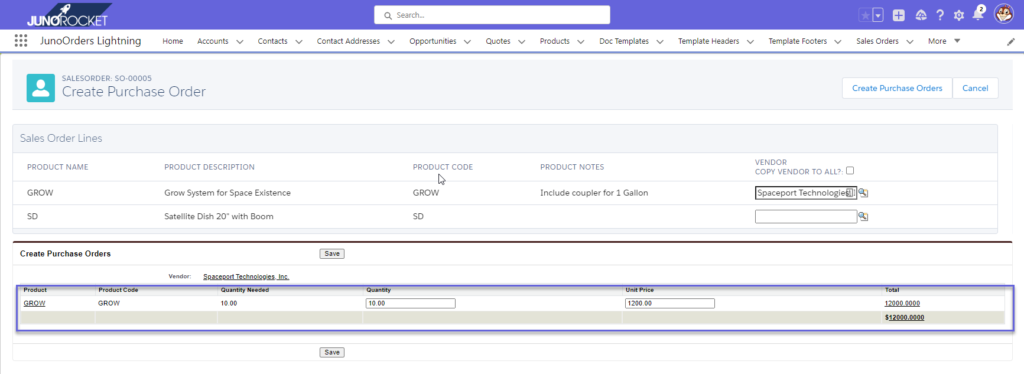
Click the lookup button next to the Vendor entry box. A list of Accounts with Vendor Type will display. Click the Vendor Account to Populate the entry box. If you are drop shipping all of the products from this Sales Order, click the checkbox to copy the Vendor name to all line items.
Note: You will only be able to view those Accounts with Type = Vendor. If you have not setup any Vendor accounts, you will need to do this first.
Once you click “Create Purchase Order”, the selected line will display below. The Quantity needed will be pulled from the Sales Order and the default cost will be pulled from the Product Cost field. You may alter both the Price and Quantity on this screen. You may also alter these values on the Purchase Order after creation. Click Save to generate the Purchase Order.
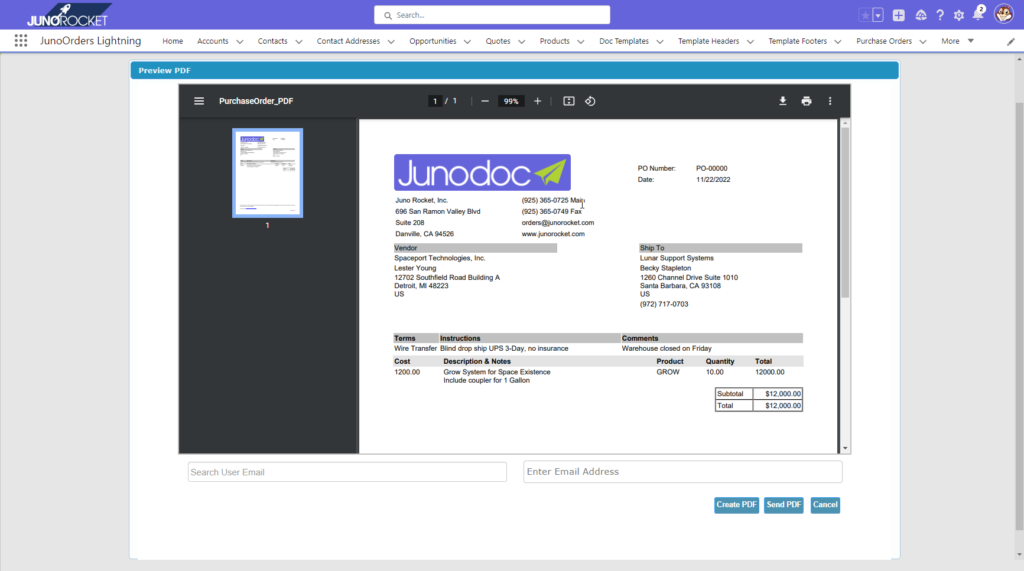
Notice that the full Vendor Address, including the Vendor Contact have been added to the Purchase Order. In addition, the Shipping Address has been pulled from the Sales Order. To send a PDF copy of the Purchase Order to the Vendor, click on the PreviewPDF button in the top right corner.
Click Send PDF and the Vendor Contact will receive a copy of the Purchase Order. In addition, you may add a Salesforce user in the box on the right, or an email address using the box on the left.
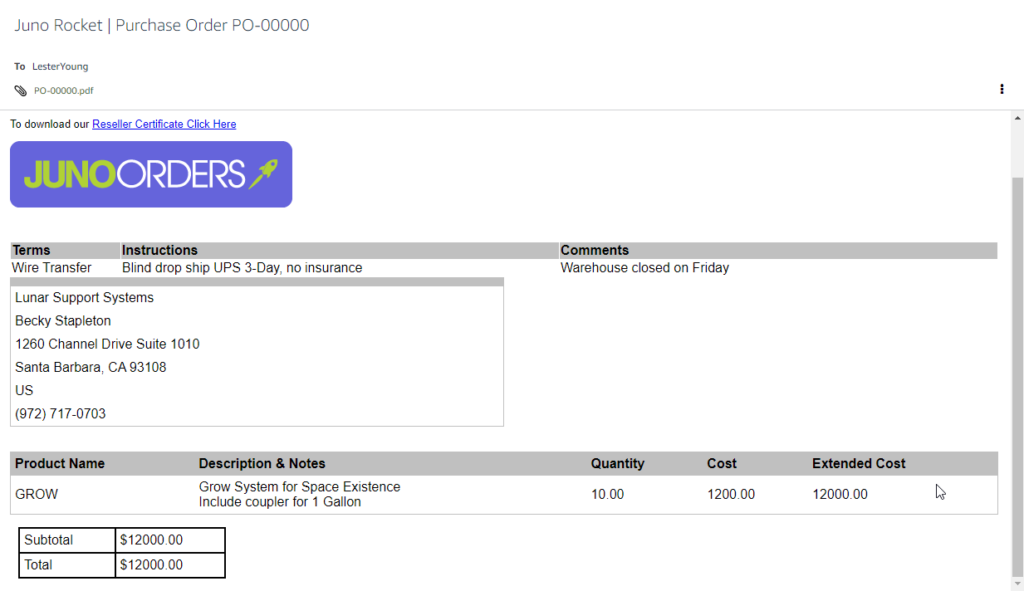
The outgoing email is HTML formatted and includes the shipping address, Purchase Order Comments, along with a full description and total of items being order. The Vendor won’t even need to open the attached PO if they don’t want to.
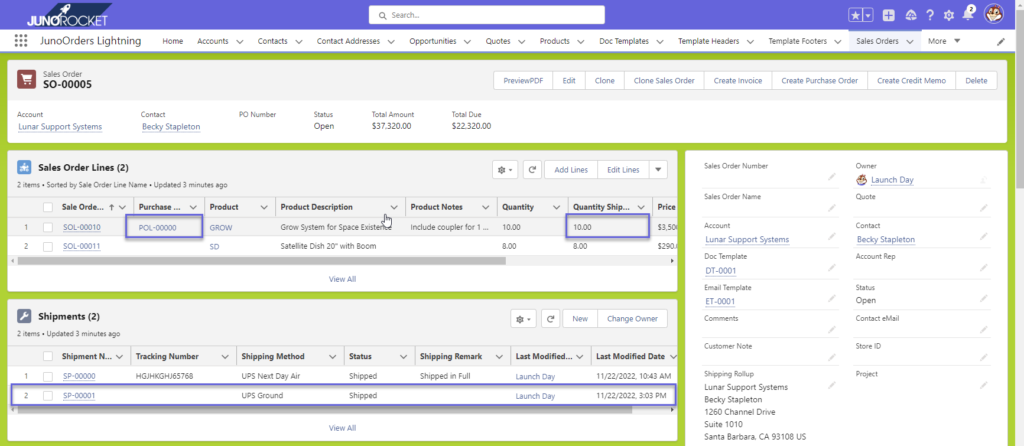
Click on the link to the Sales Order and we will view how the Purchase Order creation affected the Sales Order.
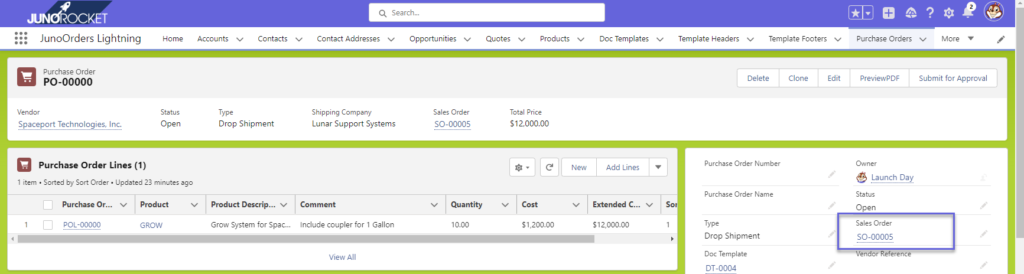
Notice how the Sales Order Line (SOL) that was Drop-Shipped now has a link to the Purchase Order Line (POL) and lists the Quantity Shipped as 10 Pieces.
You will also observe that a new Shipment Line was created as part of the Drop Shipment. Once the Vendor provides you with Shipment Tracking, you can add that to the Shipment.
Invoice
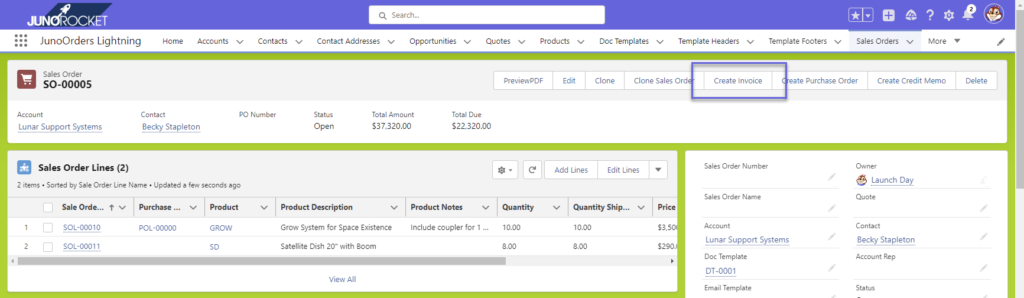
Similar to the Sales Order, you can create an Invoice by clicking on the Invoice tab and selecting “New”. However, most Invoices are created from Sales Orders, so this is where will will direct our attention.
Start with an existing Sales Order. In the upper right corner, click the “Create Invoice” button.
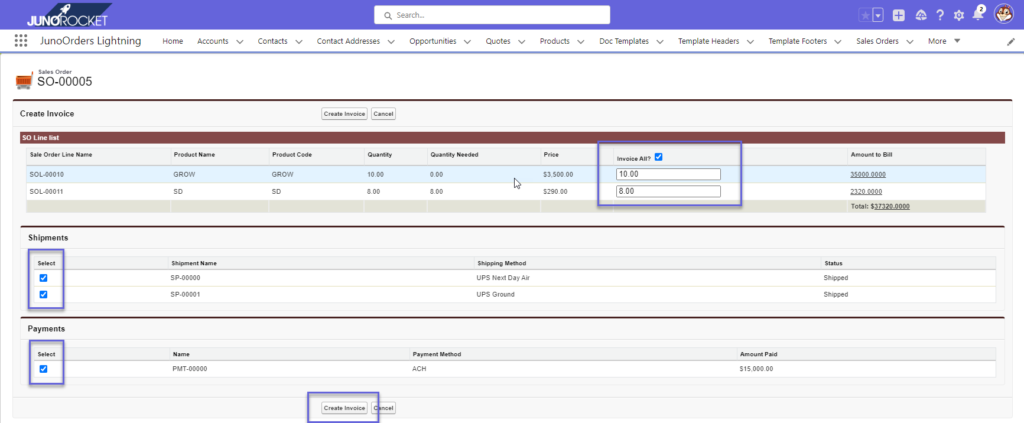
On the next screen, you have the opportunity to select the Sales Order Lines (SOLs) that will be invoiced, along with any Shipments that are related to those lines and finally and Payments that were added to the Sales Order, that should be applied to the Invoice.
Because you may create multiple invoices against a single Sales Order, we offer these options for maximum flexibility.
In this example, we will select all Sales Order Lines (SOL), Shipments (SP) and Payments (PMT) to be copied over to the newly created Invoice. Click “Create Invoice”.
You’ll see the newly created Invoice which contains all of the Line Items selected from the Sales Order in addition to the Payments and Shipments.
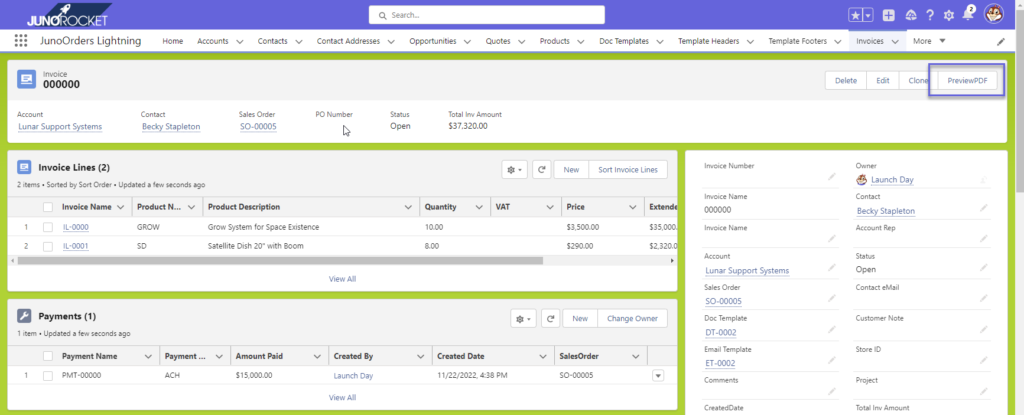
Similar to sending out a Quote, when you send an Invoice, you have the ability to send a copy to a Salesforce User (box on the left) or include an email address (box on the right).
Purchase Orders
The Purchase Order object offers the flexibility to generate Purchase Orders for Products, Services and Expenses. To review how drop-shipment Purchase Orders work, see the Sales Order portion of this Users Guide. In this section, we will demonstrate how the simple Purchase Order works.
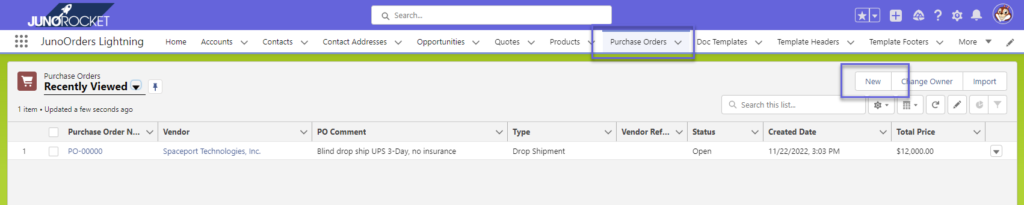
To create a new Purchase Order, click on the Purchase Orders object from the top ribbon, then click “New” from the top right of the Purchase Order list.
The Type will default to “Standard”, which is what we are going to demonstrate here. Scroll down the window and choose a “Location”. Locations are addresses where you may either have product delivered or services rendered. We cover Locations in another section.
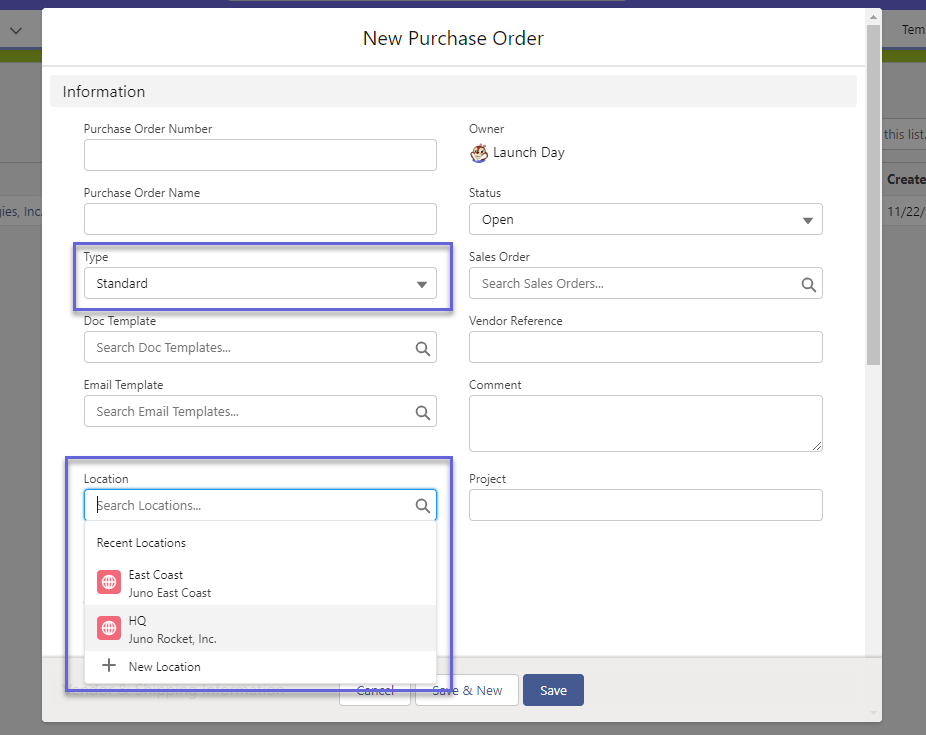
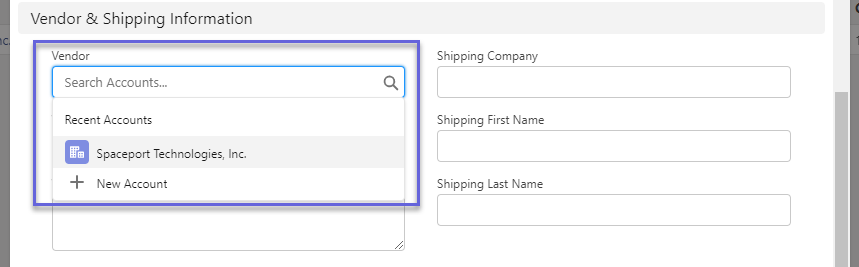
Scroll down further to select the “Vendor”. Only Accounts with Type = Vendor will appear in this list. You may need to type in the first three characters of the vendor name as well. The Vendor Contact and Vendor Address will populate after you hit save. Click Save.
The Purchase Order is created. Notice the Vendor, Contact and Address are all filled in from the Vendor Account. In addition, the Shipping Address is populated by the “Location” details. Notice also, the “Terms” are populated from the Vendor Account.
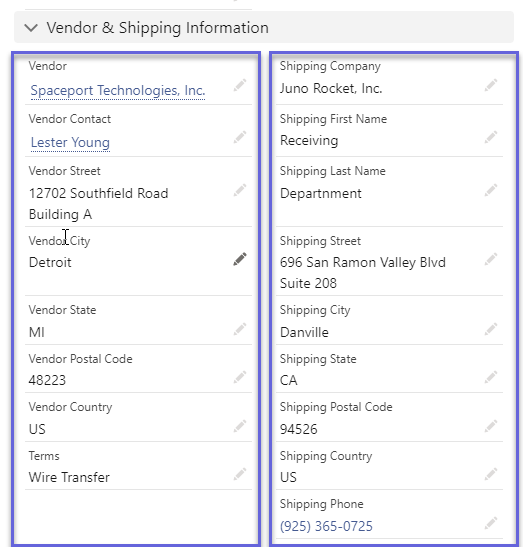
Purchase Order Lines
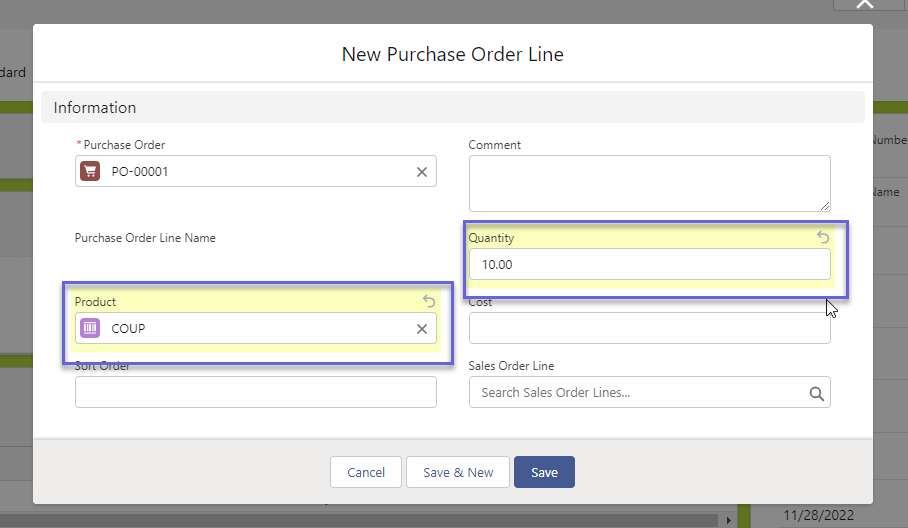
To add Products or Services to the Purchase Order, click on the “New” button on the Purchase Order Lines (POL) Related List.

Located the Product or Service you wish to add and enter a Quantity as well. The Cost will be copied from the Product Cost field. You can change that here now or change it later after the Products and Services have all been added.
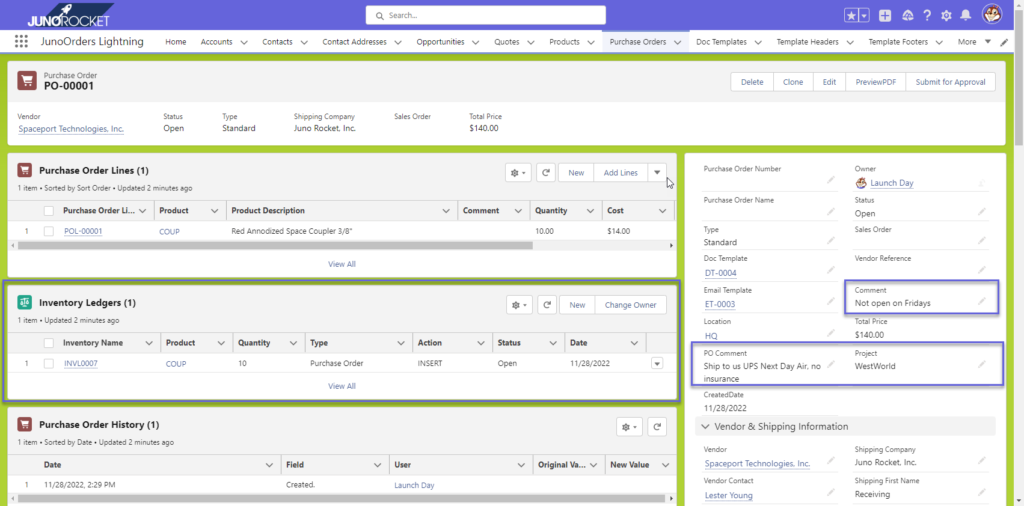
Line items are added to the Purchase Order Line (POL) Related List. Notice also, that the Inventory Ledger keeps track of these Inventory items that are on Purchase Order and changes to physical stock once in stock.
In addition, you have PO Comment (Picklist), which can be modified to fit your needs, along with a Comment field and Project field to assist with organizing your Purchase Orders and reporting.
To send the Purchase Order to the Vendor, click on the PreviewPDF button. Similar to the Quote and Invoice, you may include a Salesforce User (left input box) or enter an email address (right input box), who will also receive a copy of the email.

Hit “Send PDF” and the document will be emailed to the Vendor Contact.