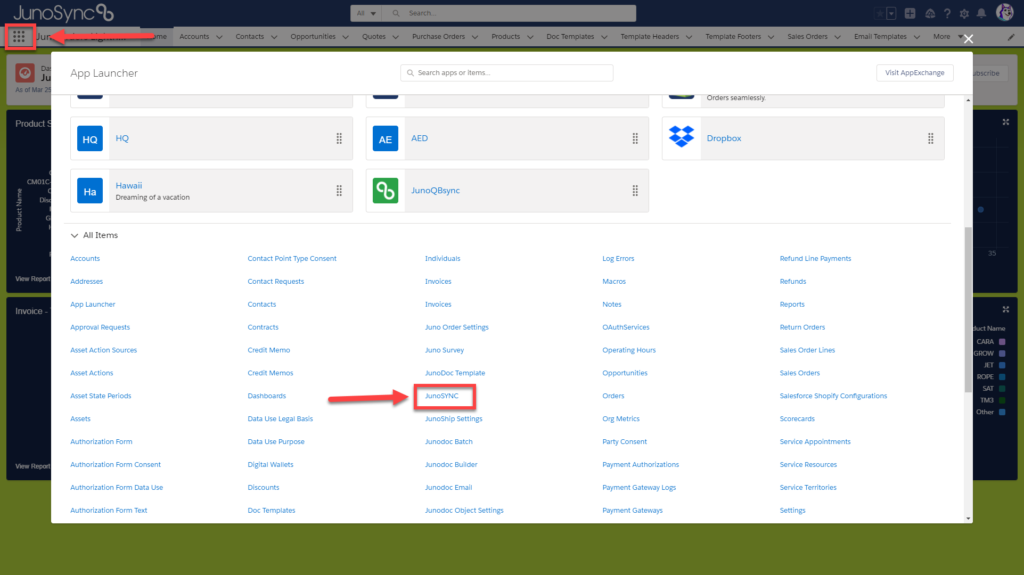
JunoSync App Launcher
To access the JunoSync QuickBooks setup, click the app launcher in the upper left corner of the Salesforce screen, the click on the JunoSync link.
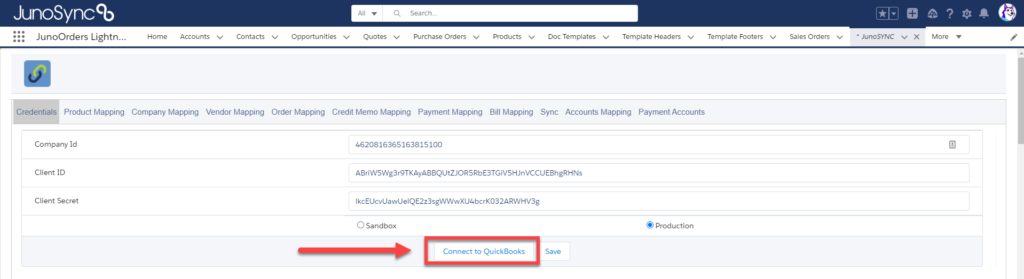
The JunoSync connection is persistent, however from time to time, you will need to re-connect. On the credentials tab, click “Connect to QuickBooks”. If you are prompted for your credentials, make sure you use the same credentials that were used during the installation phase.
Products
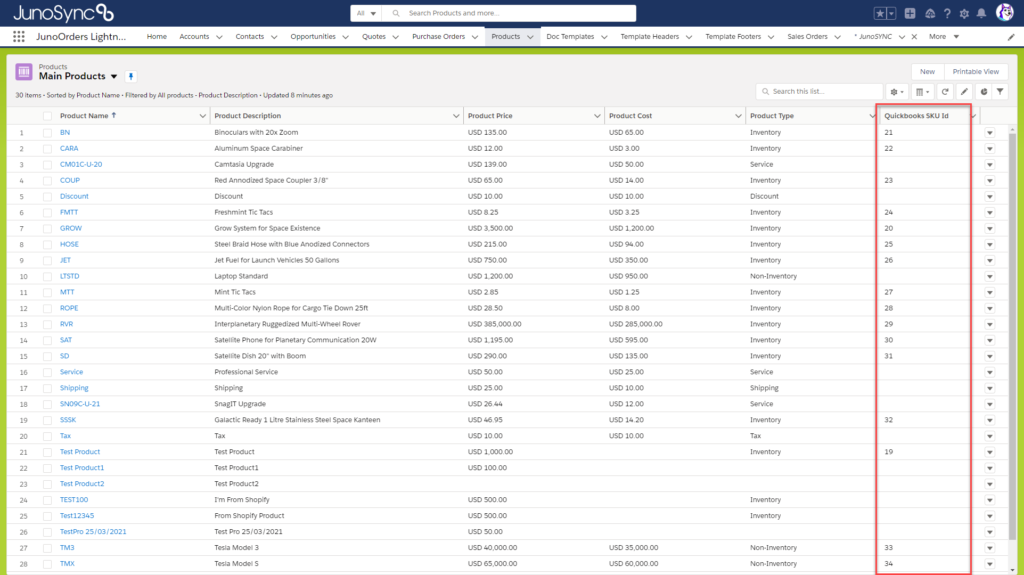
Once you are confirmed connected, you will be able to proceed with synchronizing records with QuickBooks. We recommend you start with Products. It’s also a great idea to add the QuickBooks SKU ID as a column in your Product list view. This way you’ll know if a product has successfully been synchronized.
Manual Sync
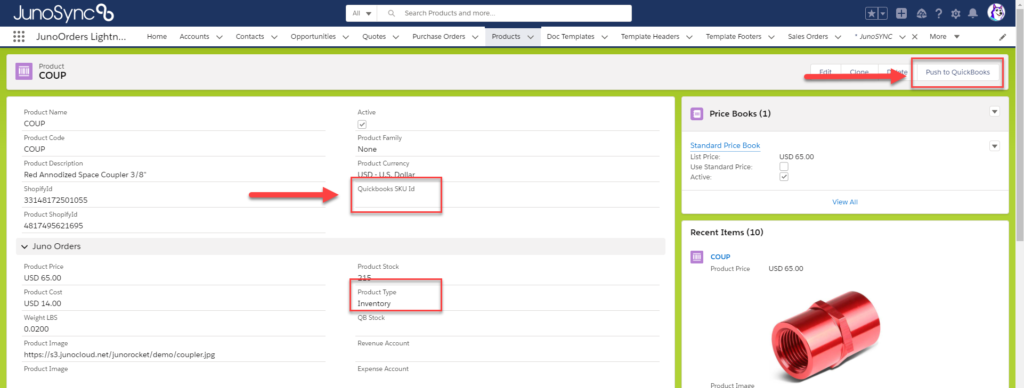
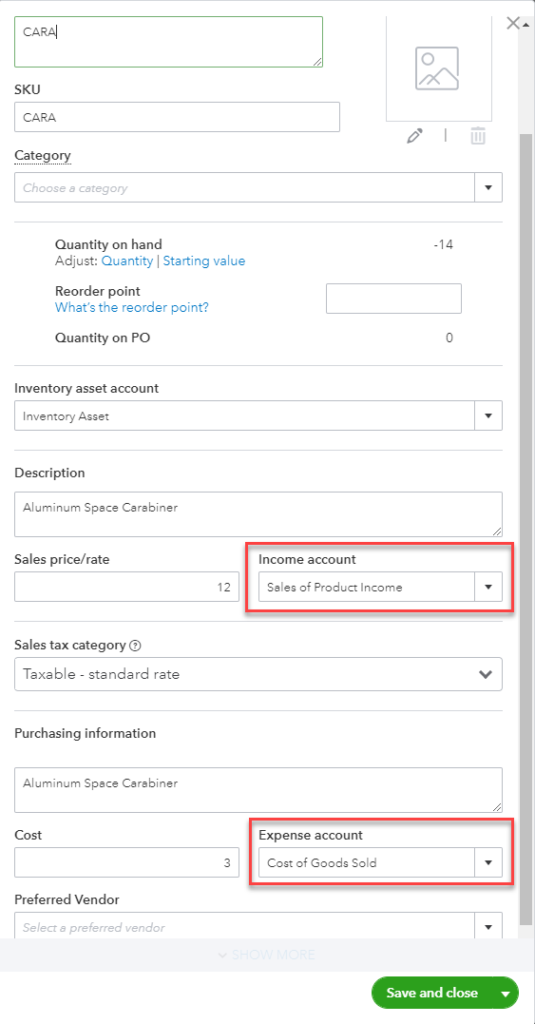
Locate a product that has not yet been synchronized. You will notice it does not have a QuickBooks SKU ID. Also confirm that the product has a “Product Type” also defined. Next, you will click the “Push to QuickBooks” button.
If the Product is not already in QuickBooks, then a new Product will be created and the QuickBooks ID will populate. If the Product is already in QB, the Product Name in Salesforce will be compared to the Product Name in QuickBooks and the existing Product ID from QuickBooks will populate in Salesforce.
JunoSync is designed to only sync products that are marked “Active” in Salesforce. If your are trying to sync products, make sure they are marked as “Active”.
This video demonstrates how an existing Product in Salesforce will sync with an existing Product in QuickBooks.
Once you have successfully create a couple of product in QuickBooks using JunoSync, you’ll want to review those products closely to make sure they are using the correct accounts for both Income and Expense. Do this a few times to ensure everything is mapped properly before you move on to bulk sync of products.
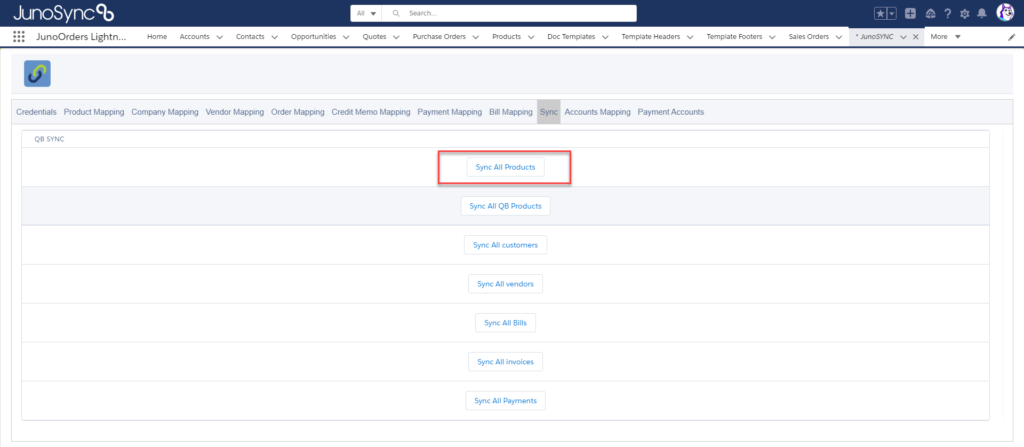
Bulk Sync
Once you have confirmed the manual products sync correctly, you can move onto a bulk sync of the whole product catalog. The “Sync All Products” means that all Products in Salesforce will Sync to QuickBooks.
If the Products you want to sync are in QuickBooks, but NOT in Salesforce, then you will want to “Sync All QB Products”, which is the second option on the list.
If you have more than 100 SKUs in your product catalog, it can take a little time for the sync to complete. One way to monitor the progress is to open QuickBooks in another tab and refresh the product list to watch new products being generated. You can also pull a list view in Salesforce of the products and refresh the screen to watch the QuickBooks SKU IDs populate in real time.
Accounts
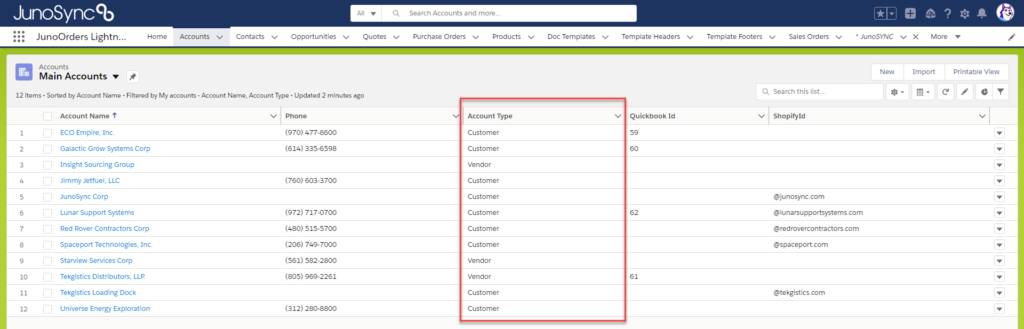
Salesforce has one bucket for all Accounts. QuickBooks maintains two separate lists for Customers and Vendors. To compensate for this differential, Juno Orders leverages a field called “Account Type”. This allows you to define an Account as either a Customer or a Vendor.
Before synchronizing Accounts, make sure they are marked as either a Customer or a Vendor as shown below.
Customers
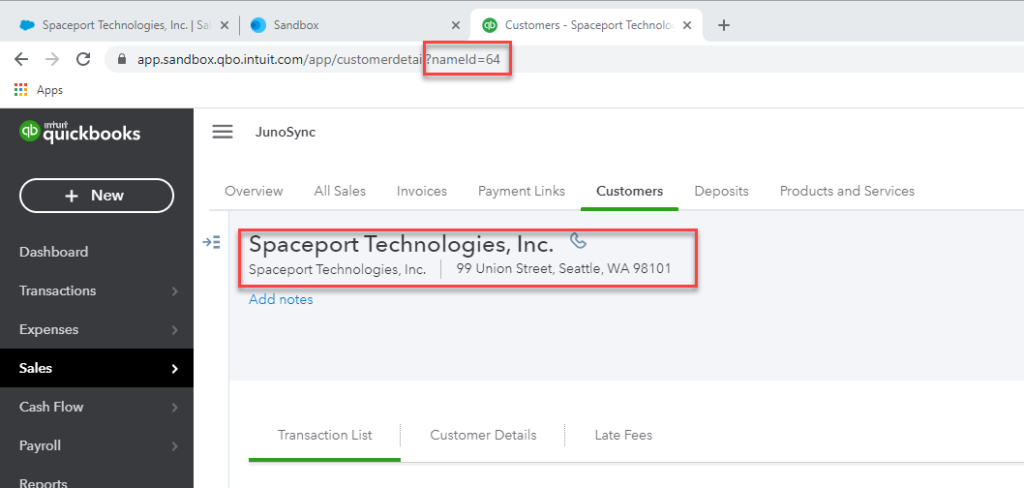
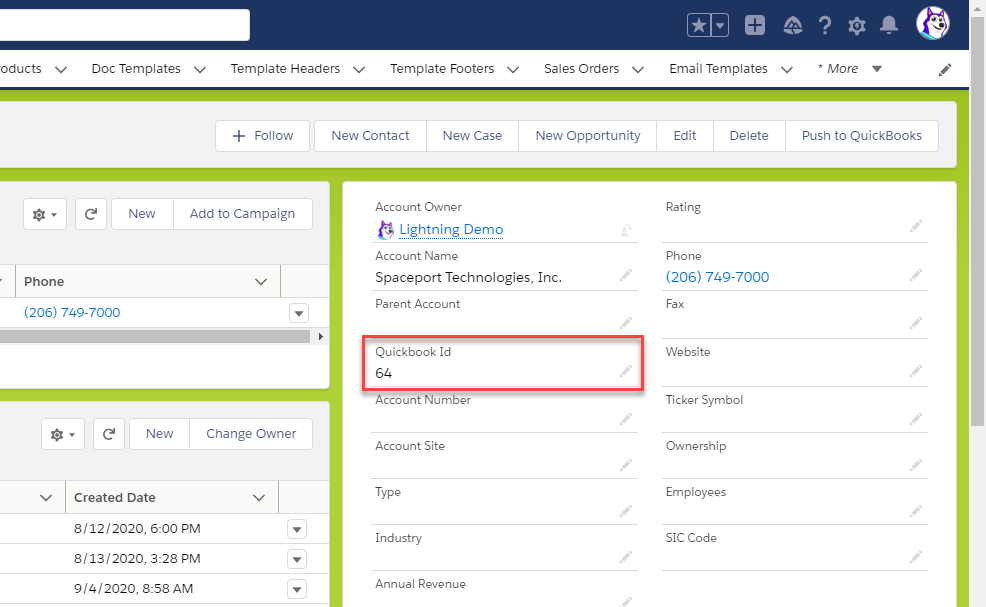
We will first synchronize a Customer Account. During the Setup, you would have added the “Push to QuickBooks” button and also the “QuickBooks ID” field to the page layout as shown below.
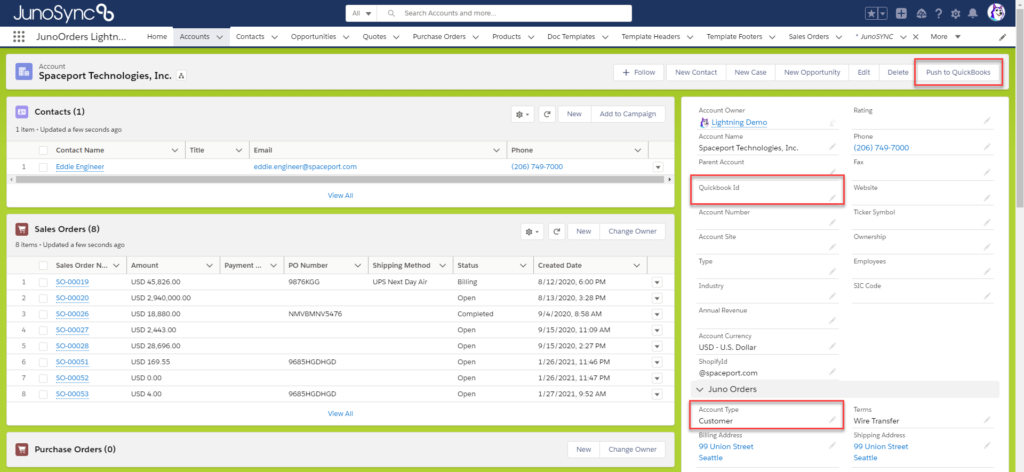
Once you select the “Push to QuickBooks” button, you will see a message of success. Switch over to QuickBooks and refresh the customer list. The Customer Account will be there. When you view the details of the Customer Account, you will see all of the details are filled in. You may also notice that the QuickBooks ID in the address bar, will match the QuickBooks ID that was added to the Salesforce Account.
Depending on how your business operates, you may decide that it’s not necessary to sync all Salesforce accounts. The way we designed JunoSync, was to allow the accounts to sync only once an Invoice has been generated. The argument being, “why sync a bunch of customer account records to QuickBooks if they haven’t yet purchased anything?”. We cover this process more in the Invoice section below.
Vendors
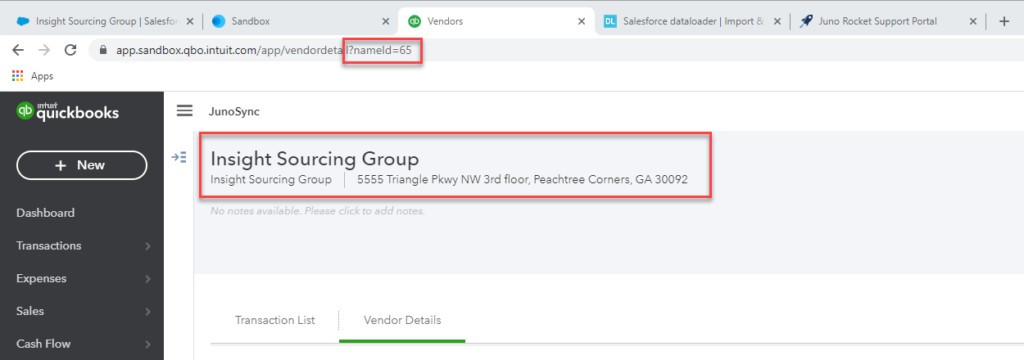
The process for synchronizing Vendor Accounts is identical the Customer Account synchronization demonstrated above. To initiate the sync, press the “Push to QuickBooks” button at the top right.

The Vendor Account is then synchronized from Salesforce to QuickBooks. Viewing the details of the newly created Vendor Account, you will see the QuickBooks ID in the address bar, matches the QuickBooks ID added to the Vendor Account in Salesforce.

If you have an existing Vendor Account in QuickBooks that matches a Vendor Account in Salesforce and you wish to manually “sync” the two, you can actually just type the QuickBooks ID into the Salesforce QuickBooks ID field and the two will be matched. It works this way for any object or record.
Invoices
Juno Orders utilizes a custom Invoice object to generate Customer Invoices in Salesforce. JunoSync allows these Salesforce Customer Invoices to sync with QuickBooks.
There are two ways to sync an Invoice from Salesforce to QuickBooks – Manual and via a Trigger. Let’s review the two methods
Manual Sync
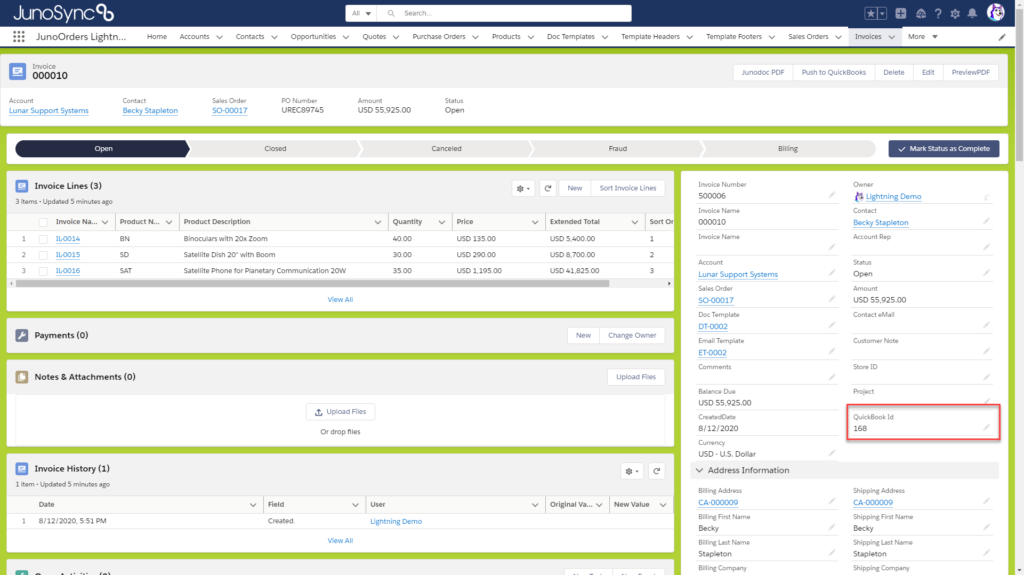
We’re assuming the you have Juno Orders and you already know how the Invoice is created AND you have already added the required “Push to QuickBooks button, along with the QuickBooks ID field to the Invoice layout. If you do not have these fields, they are described in the Setup section of the JunoSync Support Site.

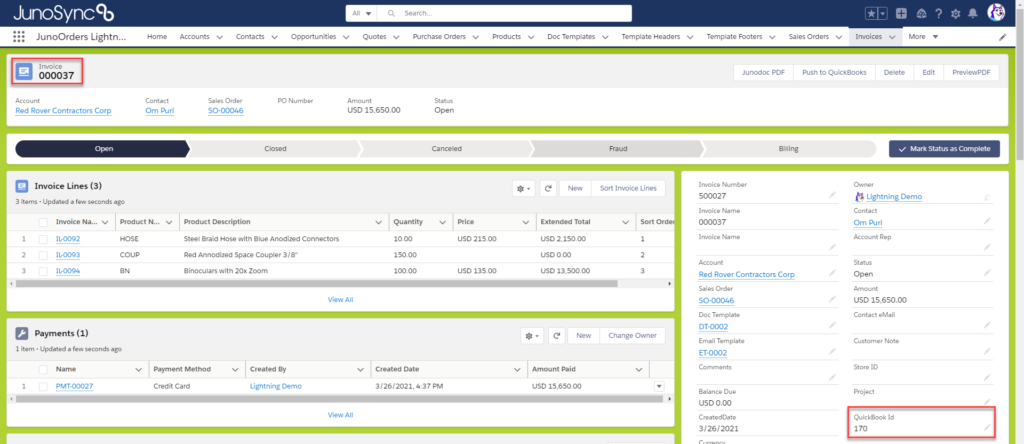
Once we “Push to QuickBooks” using the button on the Invoice layout, the Invoice will be synchronized from Salesforce to QuickBooks. You see the Customer, Address and Product details all perfectly match the Invoice we pushed from Salesforce.
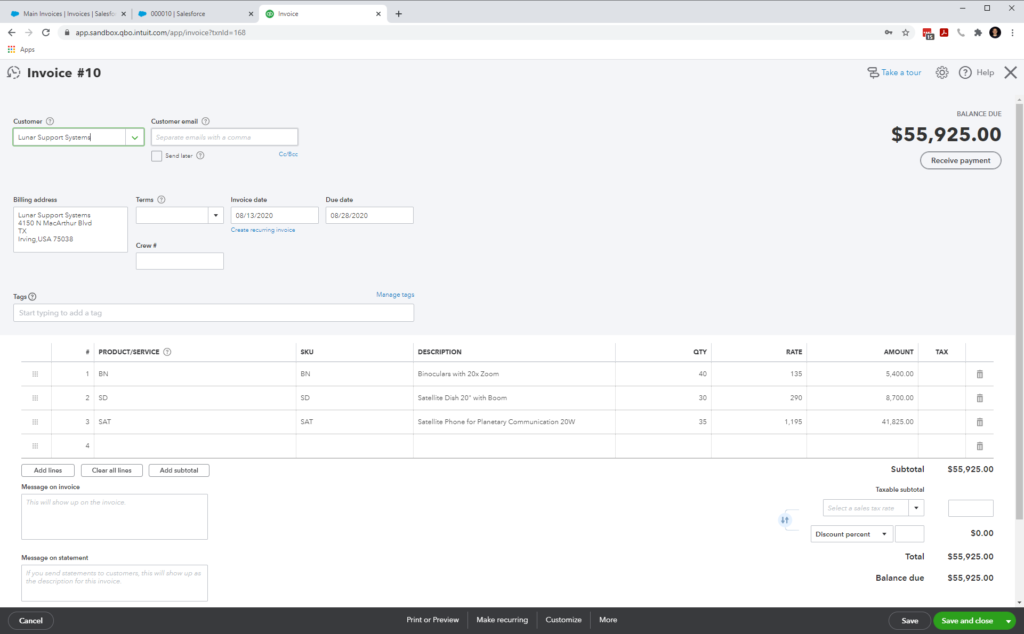
The Invoice QuickBooks ID is also added back to the Invoice in Salesforce.
Trigger Sync
The second method to synchronize a Salesforce Invoice with QuickBooks is to leverage the “Trigger Sync”. This is accomplished by changing the Sales Order Status to “Billing” as shown below.
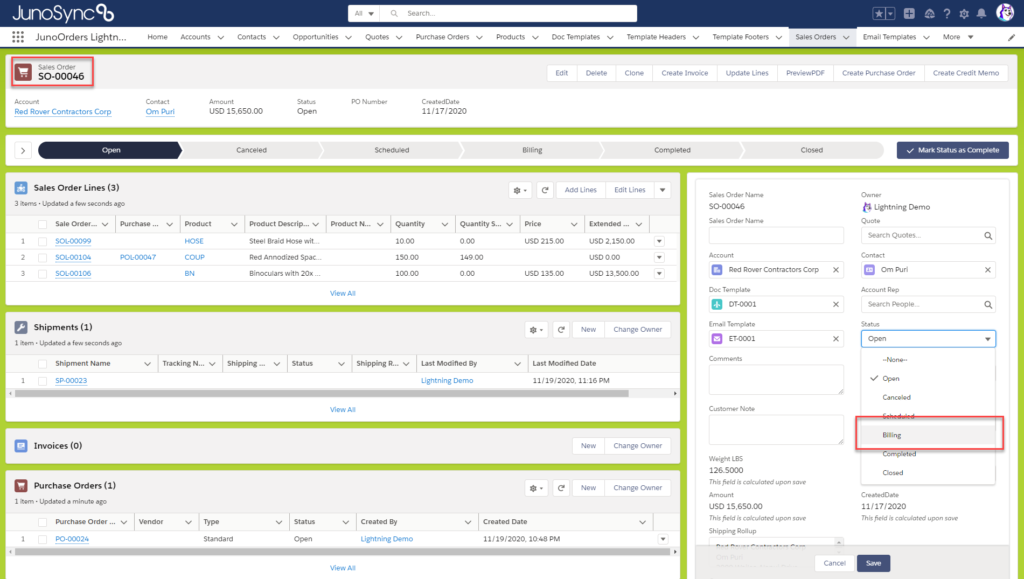
By selecting “Billing” from the “Status” drop down list, this “Trigger” will perform the following steps.
- Checks to see if the Account is already synchronized with QuickBooks. If not, the trigger will sync the Account and move to the next step.
- Creates an Invoice for all of the products on the Sales Order, regardless of whether they are marked as shipped or not.
- Sends an email (with Invoice attached) to the Contact on the Sales Order, along with the Account Contact identified as the “AP Contact”.
- Synchronizes the Invoice to QuickBooks Online.
VAT Tax

Quickbooks is particular on how the VAT Tax is named. On the bottom right hand corner, in the “Amounts are” picklist, an option has to be selected and is required for QB.

When you look at the actual Taxes and see the Tax Name, Tax Percent and Description, all have to be identical.
Example: If it was created with a 20% S and there was not a 20.0% S like the one above, you would need to create a new one that starts off with the correct name.